Introducing Emerald
Emerald is an open-source, modular framework for deploying reliable, easy to operate, high performance, EVM-compatible networks.
The Case for Emerald
Society runs on networks of trust: shared expectations and reputations that let us coordinate and innovate at scale.
Blockchains strengthen these networks with transparent rules and auditable operations. Bitcoin enabled global value transfer. Ethereum made trust programmable. But their large-scale governance makes it hard for institutions to define specific trust rules.
Emerald empowers institutions to build networks of trust with tailored governance and compliance logic while retaining the reliability and interoperability of decentralized systems.
Main Components
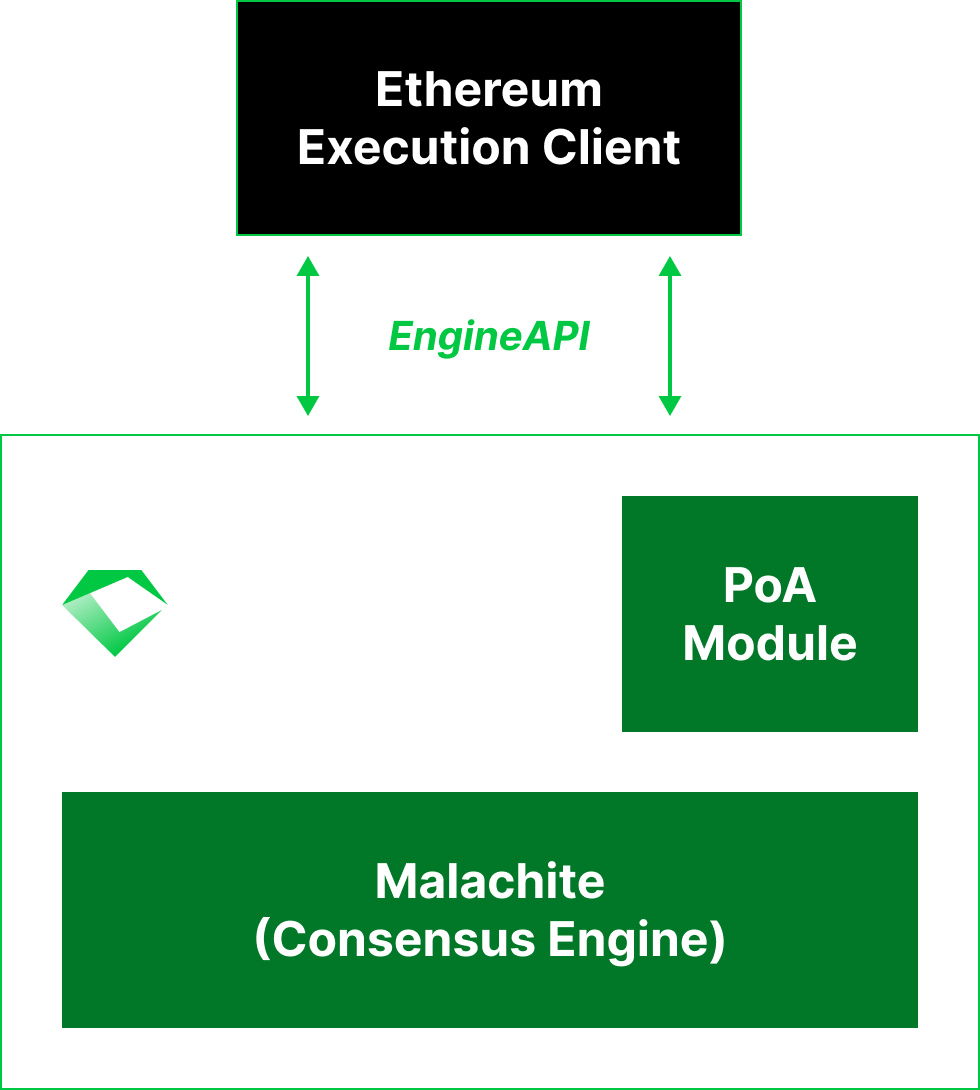
Emerald’s architecture is intentionally clean and composable, consisting of three key components:
- The Malachite consensus engine
- An Ethereum execution client (currently Reth) integrated via Engine API
- A proof-of-authority (PoA) module
For more details, please refer to the Architecture section.
Key Features
Emerald’s modular design keeps the system easy to understand, maintain, and extend while providing full EVM compatibility, instant finality, predictable performance, and simple deployment and operation.
- EVM Compatibility. Full EVM compatibility enables seamless integration with existing developer workflows, libraries, and infrastructure, making it easy to build, deploy, and maintain applications. It also means Emerald networks can tap directly into Ethereum’s thriving DeFi landscape and the wide range of applications already built for it, including bridges, explorers, indexers, and interoperability protocols.
- Instant Finality. Emerald leverages Malachite as its consensus engine. As a high-performance implementation of the Tendermint Byzantine Fault Tolerant (BFT) protocol, Malachite provides single-slot finality, meaning that transactions are finalized immediately once a block is committed.
- Predictable Performance. Emerald’s PoA-based model not only fits naturally with institutional networks of trust (where participants are well-known organizations that can use their reputations as stake), but it enables predictable performance. With a fixed, accountable validator set and instant finality consensus, block times remain stable, latency is low, and throughput is consistent.
- Simple Deployment and Operation. Emerald is built on battle-tested technology: Malachite is a formally specified Tendermint consensus implementation and Reth is a high-performance Ethereum execution client. In addition, Emerald comes with a state-of-the-art runbook on how to operate a production network.
Use Cases
Building on Emerald simplifies development through full EVM compatibility that provides access to established Ethereum tooling, libraries, and workflows. Teams can quickly create powerful applications by leveraging existing components like DeFi protocols, bridges, and token standards that work natively on Emerald without modification.
With this foundation, Emerald serves institutional adoption through applications organizations increasingly prioritize:
- Real-world asset tokenization systems requiring transparent governance.
- Cross-border payment networks needing predictable performance.
- Trading platforms reliant on verifiable execution.
These applications are already being built on Emerald today, including RWA platforms, decentralized exchanges, and payment networks.
Contributing & Support
Emerald is developed by Informal Systems. For questions, issues, or contributions, please visit the Emerald GitHub Repository.
Architecture
Emerald is a modular framework designed with simplicity at its core, enabling users to deploy reliable, easy to operate, high performance, EVM-compatible networks. Its architecture is intentionally clean and composable, consisting of three key components.
Consensus Layer
Emerald leverages Malachite as its consensus engine. Malachite is the most optimized and lightweight evolution of the Tendermint Byzantine Fault Tolerant (BFT) protocol, which is the most battle-tested consensus protocol in blockchain today.
Key Properties
Separation From Execution. Consensus is separated from execution, allowing modular development and easy component customization.
Single-Slot Finality. Transactions are finalized immediately once blocks are committed, without the risk of reorgs.
Formally Specified. Malachite was formally specified using the Quint specification language.
Low Latency. Malachite finalizes blocks in under one second, delivering the low-latency confirmation times required for high-performance institutional applications.
High Throughput. Malachite without an Ethereum execution client on top can reach up to 71.7k TPS for single datacenter deployments and up to 41.4k TPS for geo-distributed deployments. When deploying with Reth as an execution client, Emerald achieves around 9,200 TPS peak and 8,300 TPS sustained on a single datacenter deployment. This demonstrates both the strength of the underlying consensus engine and the clear potential to further optimize Emerald.
Malachite Integration
Emerald uses Malachite’s channel-based interface for integration. This provides built-in synchronization, crash recovery, networking for consensus voting, and block propagation protocols.
Emerald, as a Malachite application, only needs to interact with the consensus engine through a channel that emits events:
-
AppMsg::ConsensusReady { reply }: Signals that Malachite is initialized and ready to begin consensus. -
AppMsg::GetValue { height, round, timeout, reply }: Requests a value (e.g., a block) from the application when the node is the proposer for a given height and round. -
AppMsg::ReceivedProposalPart { from, part, reply }: Delivers parts of a proposed value from other nodes, which are reassembled into a complete block. -
AppMsg::Decided { certificate, reply }: Notifies the application that consensus has been reached, providing a certificate with the decided value and supporting votes.
Note
Emerald doesn’t currently support the following Malachite events:
AppMsg::RestreamProposalAppMsg::ExtendVoteAppMsg::VerifyVoteExtension
Additional Features
Value Sync
Malachite expects nodes that fall behind to use a different protocol to catch up without participating in consensus. In Malachite terminology, this protocol is referred to as Value Sync (as the nodes sync on the past values decided by Malachite). In the context of Emerald, these values consists of Ethereum blocks.
Emerald handles the following events emitted by Malachite, in order to implement the Value Sync protocol:
-
AppMsg::ProcessSyncedValue { height, round, proposer, value_bytes, reply }: Used to process and validate values received from other peers while syncing. The values are validated against the execution client and stored for processing in the Decided function. -
AppMsg::GetDecidedValue { height, reply }: Used to provide peers that are behind with already decided values stored. Note that Emerald caches a certain number of blocks locally, but the actual block history is stored in the execution client. -
AppMsg::GetHistoryMinHeight: Used to update peers on the minimum height for which the local node has a block.
Execution Layer
Emerald integrates with Ethereum execution clients through Engine API, allowing it to plug into a mature execution ecosystem. Currently, Emerald integrates with Reth and the roadmap includes support for additional clients.
Key Properties
EVM Compatibility. Users can run existing Ethereum smart contracts on Emerald without modification. Consequently, they can leverage established standards such as ERC-20, ERC-721, and ERC-4626.
Rich Ecosystem Support. Users get immediate access to wallets, block explorers, indexers, and developer frameworks. Emerald provides native compatibility with DeFi protocols, bridges, token standards, and interoperability layers.
Continuous Performance Improvements. Emerald benefits from ongoing optimizations and research from active Ethereum client development. Users remain aligned with performance and scalability upgrades adopted by the Ethereum ecosystem.
Reduced development overhead. Emerald networks do not need to build or maintain a custom execution layer, resulting in faster time-to-market with lower operational burden.
Reth Integration
In Emerald, it is the responsibility of the execution client to build and validate blocks as consensus has no application specific knowledge on what a block contains. Emerald integrates with the execution client via Engine API.
In the context of Engine API, Emerald is the consensus layer that acts as a client issuing RPC requests to the execution client, which serves as the RPC server. The core methods are:
exchangeCapabilitiesAllows the consensus and execution clients to exchange and negotiate supported Engine API capabilities. It ensures both sides understand each other’s feature set (e.g., versioned payload types, optional fields), enabling forward compatibility and coordinated upgrades across client releases.forkchoiceUpdatedUpdates the execution client with the Emerald’s latest finalized block. IfpayloadAttributesare provided, it also instructs the execution client to begin building a new block and returns apayloadIdfor later retrieval.getPayloadReturns the execution payload associated with a previously issuedpayloadId. It finalizes the block under construction and hands it to Emerald so it can be proposed for inclusion on-chain.newPayloadDelivers a newly built (i.e., proposed) execution payload from Emerald to the execution client for validation. It verifies the block’s correctness and, if valid, incorporates it into the local chain state.
For a detail description of these methods and how they work, please refer to the Engine API visual guide.
Emerald is calling the Engine API RPC methods when handling events emitted by the Malachite consensus engine:
-
AppMsg::ConsensusReadyEmerald callsexchangeCapabilitiesto check compatibility with the execution client. Then, it gets the genesis block from the execution client by calling theeth_getBlockByNumberEthereum RPC. Note that when restarting after a crash, Emerald retrieves the latest decided block from its local store and callsforkchoiceUpdatedto update the head of the chain in the execution client. -
AppMsg::StartedRoundEmerald starts the next height / round of consensus by retrieving pending proposal data and validating it against the execution client via anewPayloadcall. -
AppMsg::GetValueOnce an Emerald node ends up being a proposer, it callsforkchoiceUpdatedwithpayloadAttributesprovided and thengetPayloadto get a new block from the execution client. Note that first Emerald calls theeth_syncingEthereum RPC call to confirm that the execution client is not syncing. -
AppMsg::ReceivedProposalPartWhen all the parts of a proposed blocked have been received, Emerald validates the block against the execution client by callingnewPayload. -
AppMsg::DecidedOnce consensus is reached, the block is validated again against the execution client (via anewPayloadcall). This is necessary as the proposer has not callednewPayloadinReceiveProposalPartsThen, a call toforkchoiceUpdatedupdates the head of the chain in the execution client. As an optimization, Emerald avoid re-validation by caching blocks that have been validated already so that non-proposing nodes do not have to callnewPayloadtwice. -
AppMsg::ProcessSyncedValueWhen Emerald is syncing, it validates blocks received from other nodes by callingnewPayload(as inRecieveProposalParts). -
AppMsg::GetDecidedValueWhen other Emerald nodes are syncing, they might ask for blocks that are no longer in the local store. In that case, Emerald is callinggetPayloadto get the block from the execution client.
Proof-of-Authority Model
Emerald adopts a proof-of-authority (PoA) model in which a set of known, trusted institutions serve as validators, anchoring the network’s security and governance in real-world accountability rather than anonymous resource competition.
Key Properties
Institutional Alignment. Emerald is designed for networks where validators are known organizations that use their real-world reputations as stake. This model naturally fits governance models based on identification, accountability, and trust relationships.
Predictable Performance. Fixed, permissioned validator sets enable stable block times, low latency, and consistent throughput. As a result, Emerald avoids the variability of anonymous, resource-competitive consensus mechanisms.
Clear Governance. Governance decisions involve identifiable entities, making upgrades, membership changes, and dispute resolution straightforward. This enables institutions to structure governance to match legal, operational, or regulatory requirements.
Credibility-Backed Security. Security is rooted in real-world accountability rather than anonymous resource expenditure. Network misbehavior can be directly attributed to specific entities, increasing system integrity.
PoA Module
The Emerald PoA module consists of two main components:
- An EVM smart contract (
ValidatorManager.sol) that keeps track of the set of validators together with their voting power. The contract provides access control to anowneraccount for updating the validator set of the Emerald network. This includes adding validators by specifying their public keys and voting powers, removing validators, and updating the voting power of existing validators. - The wiring that enables Emerald to pass the validator set from the execution layer to the consensus engine.
After every finalized block (on
AppMsg::Decided), Emerald queries the EVM state by calling thegetValidatorview function of theValidatorManagercontract and updates its local state. Then, it informs Malachite of the new validator set for the next height.
Syncing
Overview
Malachite Sync
ValueSync is a protocol that runs alongside consensus to help nodes catch up when they fall behind. It operates as a client-server system where each node runs both roles simultaneously.
How it works:
- Height announcements — Servers periodically broadcast their current consensus height to the network.
- Gap detection — Clients compare their local height against announced remote heights.
- Request missing data — When a client detects it’s behind, it requests the missing height(s) from peers.
- Serve from store — The server retrieves the decided value and commit certificate from its local store and sends them back.
- Deliver to consensus — The client passes the synced data to the consensus layer, which processes it identically to data received through normal consensus operations.
When using Malachite’s Channel API, ValueSync interacts with the application through two operations:
GetDecidedValue— Malachite requests a previously decided value from the application’s storage (used by the server to fulfill sync requests)ProcessSyncedValue— Malachite notifies the application that a value has been synced from the network (used by the client to deliver received data)
This design keeps syncing logic separate from consensus while reusing the same validation and commitment paths, i.e, a synced block goes through the same checks as a block decided in real-time.
Reth Sync
Post-merge, Reth does not autonomously advance its canonical chain. It relies on the consensus layer (CL) to drive block import and chain head selection via the Engine API. Reth’s P2P sync is purely reactive and on-demand:
newPayloadis the primary way blocks enter Reth. It validates and executes the payload, then inserts it into the in-memory block tree (tree_state.blocks_by_hash). If the parent is unknown, the block is buffered (not rejected) and automatically connected when the parent arrives.forkchoiceUpdatedsets the canonical chain head. It requires the target block to already exist in the tree state (imported vianewPayload). If the block is missing, Reth returnsSYNCINGand emits aDownloadevent to fetch it from peers via P2P.getPayloadonly reads from Reth’s in-memoryPayloadStore(built payloads). It does not import blocks into the tree state.
Reth nodes are connected via P2P (explicit peering via add_peers.sh or --trusted-peers). When Reth detects missing blocks — either through a forkchoiceUpdated pointing to an unknown hash or through peer announcements (NewBlockHashes, NewBlock) — it downloads them from peers. However, it will not advance the canonical chain until the CL instructs it via forkchoiceUpdated. The CL is the authority on what’s canonical.
In Emerald’s architecture, newPayload is the optimal path for feeding blocks to Reth during sync: Emerald already has the full payload from Malachite’s ValueSync, so importing it directly is faster and more reliable than waiting for Reth P2P download.
Emerald Sync
sequenceDiagram
    box Node 1 (Behind)
        participant M1 as Malachite
        participant E1 as Emerald
        participant EC1 as EL
    end
    box Node 2 (Ahead)
        participant M2 as Malachite
        participant E2 as Emerald
        participant EC2 as EL
    end

    M1->>M2: Exchange Status
    M1->>M2: requestSyncValues

    M2->>E2: AppMsg::GetDecidedValue

    alt Height available locally
        E2->>E2: Return from store
    else Height not available
        E2->>EC2: engine_getPayloadBodiesByRange
        EC2-->>E2: Payload bodies result
    end

    E2-->>M2: Return result
    M2-->>M1: Return result

    M1->>E1: AppMsg::ProcessSyncedValue
    E1->>E1: Decode and store value (no EL call)
    E1-->>M1: Return result

    M1->>E1: AppMsg::Decided
    E1->>EC1: newPayload (import into tree state)
    EC1-->>E1: Validation result

    alt Valid
        E1->>EC1: forkchoiceUpdated (set canonical head)
        EC1-->>E1: Updated
        E1->>E1: Commit and advance height
    else Syncing
        loop Retry mechanism
            E1->>EC1: newPayload (retry)
            EC1-->>E1: Validation result
        end
    end

    E1-->>M1: Return result
Sync Request Handling
The sync request contains the height. The expected response includes the value_bytes and the commit certificate.
When Emerald receives AppMsg::GetDecidedValue, it processes it as follows:
- Check if the requested height falls within the available range (
earliest_certificate_height..consensus_height). If not, returnNone. See Pruning. - If the full block data is available locally (height >= earliest unpruned height), return it directly from storage.
- Otherwise, reconstruct the payload from the locally stored block header and the block body fetched from the EL via
engine_getPayloadBodiesByRange. If the EL cannot provide the body (pruned or unavailable), returnNone. See Block Reconstruction.
Block Reconstruction
engine_getPayloadBodiesByRange returns only transactions and withdrawals — not the header fields (parent_hash, state_root, timestamp, etc.). To reconstruct a full payload, Emerald stores block headers (the payload with transactions and withdrawals stripped) at commit time. This keeps storage lightweight while allowing full payloads to be reconstructed on demand from header + EL body.
eth_getBlockByNumber could serve a similar purpose, but getPayloadBodiesByRange was chosen because it is purpose-built for sync. Currently it is called with a count of 1 (one block at a time). Although getPayloadBodiesByRange supports range queries, Emerald cannot take advantage of this because Malachite requests only one value at a time from the application via GetDecidedValue. At the consensus level, nodes request batches of values from each other, but consensus delivers them to the app one by one, so Emerald has no way of knowing what the remaining values in the batch are.
Pruning
Emerald prunes two categories of data independently:
- Certificates + block headers: retained for the last
num_certificates_to_retainheights (default: unlimited). Pruned everyprune_at_block_intervalheights (default: 10). This defines theearliest_certificate_height— the lower bound for sync requests. - Block data (decided values, undecided proposals, pending parts): retained for the last
num_temp_blocks_retainedheights (default: 10). This defines theearliest_unpruned_height— below this, block bodies must be fetched from the EL.
For heights where block data has been pruned but certificates remain, Emerald reconstructs the payload from the stored header + EL body (see Block Reconstruction). If the EL has also pruned the block (depends on Reth’s node type and pruning config), the sync request returns None.
Warning
In order for a node to be able to sync from any height, there has to be at least one archival node in the network that can provide historical data. We plan to add snapshot syncing to remove this constraint.
Sync Response Handling
Upon receiving a response from a peer, Malachite provides the height, round, proposer, and value_bytes to the application (Emerald) via the AppMsg::ProcessSyncedValue message.
The application processes it as follows:
- Decode the value from its wire format.
- Store the block data as undecided so that it can be retrieved when the
Decidedmessage arrives. - Return the decoded value to Malachite without calling the EL.
No newPayload call is made during this step. Malachite has already verified the commit certificate, proving that 2/3+ of the validator set accepted this value, so EL validation is redundant.
The proposal is thus marked as valid.
The newPayload call is deferred to the Decided handler, where it is required to import the block into Reth’s tree state before forkchoiceUpdated can set it as canonical head. If Reth returns SYNCING (e.g., because the parent block is not yet available), the retry mechanism re-sends the request until Reth returns VALID or INVALID. Note that in order to get to this point, the CL will have to have obtained 2/3+ certificates validating this block, thus the EL should never return INVALID at this point. In case it does, the node will not be able to proceed.
Sync Configuration
Emerald Configuration (emerald.toml)
| Parameter | Default | Impact on syncing |
|---|---|---|
num_certificates_to_retain | unlimited (u64::MAX) | Determines how far back this node can serve sync requests. Once a certificate is pruned, the corresponding height can no longer be served to peers. This value should follow the pruning related configuration of the EL. |
num_temp_blocks_retained | 10 | Number of heights for which full block data is kept locally. Below this, block bodies must be reconstructed from stored headers + EL. |
prune_at_block_interval | 10 | How often (in heights) certificate pruning runs. Does not affect block data pruning, which runs every height. |
retry_config.max_elapsed_time | 10s | Total timeout for newPayload retries when Reth returns SYNCING during the Decided handler. If exceeded, the node errors. |
retry_config.initial_delay | 100ms | Initial delay between retry attempts (exponential backoff with 2x multiplier, capped at max_delay). |
el_node_type | archive | Declares the Reth pruning mode. Affects whether getPayloadBodiesByRange can serve old blocks when reconstructing pruned data. |
Important
num_temp_blocks_retainedmust be >= Reth’sengine.persistence-threshold. If it is lower, the node will not be able to restart after a crash because Emerald will have pruned block data that Reth has not yet persisted to disk.
Reth Configuration
| Parameter | Impact on syncing |
|---|---|
--trusted-peers / add_peers.sh | P2P connectivity between Reth nodes. Required for Reth to download blocks from peers when forkchoiceUpdated points to an unknown block. |
| Node type (archive / full / custom) | Archive nodes retain all blocks from genesis. Full nodes prune old blocks, which means getPayloadBodiesByRange may return null for pruned heights. Must match Emerald’s el_node_type setting. |
engine.persistence-threshold | How many blocks Reth keeps in memory before flushing to disk. Must be <= Emerald’s num_temp_blocks_retained (see above). |
Example Flow
Consider a node that falls behind. Both Malachite and Reth detect they are lagging (Malachite via status exchanges, Reth via P2P peer announcements).
Malachite drives the catch-up. For each missing height, a peer’s Malachite asks its local Emerald for the decided value (GetDecidedValue). Depending on what’s available locally, Emerald either returns the value from storage or reconstructs it from the stored header + EL body (see Sync Request Handling).
On the catching-up node, Malachite delivers each synced value to Emerald (ProcessSyncedValue), which decodes and stores it. When Malachite confirms the decision (Decided), Emerald imports the block into Reth via newPayload and advances the canonical head via forkchoiceUpdated (see Sync Response Handling).
If Reth returns SYNCING (e.g., because it hasn’t yet received the parent block from its own P2P sync), Emerald retries until the import succeeds or times out.
EVM Compatibility
Emerald is an EVM-compatible chain. Developers can deploy standard EVM smart contracts and interact with the network using familiar Ethereum JSON-RPC APIs and tooling.
As of the v0.2.0 release, Emerald targets the Osaka EVM hardfork.
While Emerald closely follows Osaka semantics, there are several important differences to be aware of.
- Consensus & Finality: Emerald uses Malachite as a consensus engine and adopts a proof-of-authority (PoA) model, providing sub-second deterministic finality. This contrasts with Ethereum, where finality is reached after approximately 12 minutes.
- Block Timestamps: Blocks are produced in under 1 second. As a result, multiple consecutive blocks may share the same timestamp. This keeps compatibility with EVM execution engines and most block explorers that expect second-level timestamp granularity.
PREV_RANDAO: On Ethereum,PREV_RANDAOcan be used as a source of randomness. On Emerald,PREV_RANDAOis always 0 and MUST NOT be used for randomness.PARENT_BEACON_BLOCK_ROOT: There is no beacon chain on Emerald. This field is populated with the hash of the previous execution block header.- EIP-4844 (Blobs): EIP-4844 blob transactions are not supported.
- EIP-7685 (Execution Requests): EIP-7685 execution request handling is not supported.
Deploy Local Testnet
This guide explains how to create and manage a local Emerald testnet. The goal is to enable developers and testers to run an Emerald network on their machine for development, testing, and experimentation. Users can spin up a testnet with a single make command or through an experimental CLI.
A local testnet is a fully functional blockchain network running entirely on your computer. It provides:
- Fast iteration: Test smart contracts and applications without waiting for public networks
- Complete control: Add/remove validators, modify network parameters, reset state anytime
- No cost: No real tokens required for testing
- Privacy: All transactions and data stay on your machine
Local Testnet vs Production Network
| Feature | Local Testnet | Production Network |
|---|---|---|
| Validators | All on your machine | Distributed across organizations |
| Data persistence | Can reset anytime | Permanent blockchain history |
| Network access | Localhost only | Public or permissioned network |
| Use case | Development/testing | Real applications |
| Setup time | ~30 seconds | Requires coordination |
For instructions on how to launch an Emerald production-grade network, please refer to the Launch Production Network section.
Setup
Prerequisites
Before starting, ensure you have:
- Rust toolchain (use rustup for easiest setup)
- Foundry (for compiling, testing, and deploying EVM smart contracts)
- Docker
- Docker Compose (usually included with Docker Desktop)
- Make (typically pre-installed on Linux/macOS; Windows users can use WSL)
- Git (for cloning the repository)
Verify installations:
rustc --version   # Should show rustc 1.85+
docker --version # Should show Docker 20.10+
make --version   # Should show GNU Make
Installation
git clone https://github.com/informalsystems/emerald.git
cd emerald
make build
Note
For building in release mode, use
make release.
Creating a Testnet
Start the Network
The default configuration creates a four validator network. From the repository root, run:
make testnet-start
The command performs all setup automatically. See below for a step by step deployment.
Verify Network is Running
Once the command completes, verify the network is operational:
# Check if blocks are being produced
curl -X POST http://127.0.0.1:8645 \
  -H "Content-Type: application/json" \
  -d '{"jsonrpc":"2.0","method":"eth_blockNumber","params":[],"id":1}'

# Expected output: {"jsonrpc":"2.0","id":1,"result":"0x5"} (or higher block number)
Access monitoring tools:
- Grafana Dashboard: http://localhost:4000 (metrics visualization)
- Prometheus: http://localhost:9090 (raw metrics data)
- Otterscan Block Explorer: http://localhost:80 (view blocks and transactions)
Step by Step
-
Testnet Data Cleanup
make testnet-clean -
Emerald Compilation
make release -
Configuration Generation
./scripts/generate_testnet_config.sh --nodes 4 --testnet-config-dir .testnet- Creates
.testnet/testnet_config.tomlwith network parameters
- Creates
-
Validator Key Generation
cargo run --bin emerald -- testnet \ --home nodes \ --testnet-config .testnet/testnet_config.toml- Create
nodes/0/,nodes/1/, etc. - Every node gets a
config/priv_validator_key.json
- Create
Within the home folder for each node there will be a nodes/0/config/config.toml file with Malachite specific configuration
(see malachitebft-config.toml for more details).
To alter this configuration for more than one node, instead of opening and editing multiple files, you can use the following command:
cargo run --package emerald-utils -- modify-config --node-config-home nodes --custom-config-file-path assets/emerald_p2p_config.toml
replacing the node-config-home with the path to your testnet, custom-config-file-path with the path to your custom configuration. An example of the custom configuration file:
[node0]
ip = "127.0.0.1"
[node0.consensus.p2p]
listen_addr =  "/ip4/127.0.0.1/tcp/37000"
persistent_peers = [
    "/ip4/127.0.0.1/tcp/37001",
    "/ip4/127.0.0.1/tcp/27002",
]


[node1]
ip = "127.0.0.1"
[node1.consensus.p2p]
listen_addr =  "/ip4/127.0.0.1/tcp/37001"
persistent_peers = [
    "/ip4/127.0.0.1/tcp/27000",
    "/ip4/127.0.0.1/tcp/27002",
    "/ip4/127.0.0.1/tcp/27003",
]
The code above replaces the default consensus.p2p section of nodes 0 and 1 to use different ports from the default values.
-
Public Key Extraction
# run for every node cargo run --bin emerald show-pubkey \ nodes/0/config/priv_validator_key.json- Outputs public keys to
nodes/validator_public_keys.txt
- Outputs public keys to
-
Genesis File Generation
cargo run --bin emerald-utils genesis \ --public-keys-file ./nodes/validator_public_keys.txt \ --devnet- Creates
assets/genesis.jsonwith:- Initial validator set (four validators with power 100 each)
- ValidatorManager contract deployed at genesis
- Ethereum genesis block configuration
- Creates
-
Reth & Monitoring Startup
docker compose up -d reth0 reth1 reth2 reth3 prometheus grafana otterscan- Docker Compose starts Reth execution clients and monitoring services
- Each Reth node initializes from
assets/genesis.json
-
Reth Peer Connection
./scripts/add_peers.sh --nodes 4 -
Emerald Startup
bash scripts/spawn.bash --nodes 4 --home nodes --no-delay
Restart a Node
Use the following command to stop the node with ID 1 (folder nodes/1):
make testnet-node-stop NODE=1
Then use the following command to restart a stopped node:
make testnet-node-restart NODE=1
Note that without providing the node ID, the commands default to node 0.
Stop the Network
make testnet-stop
This stops all Docker containers but preserves data.
Clean the Network
make testnet-clean
Warning: All testnet data is deleted.
- All node data (
nodes/) - Genesis file (
assets/genesis.json) - Testnet config (
.testnet/) - Docker volumes (Reth databases)
- Prometheus/Grafana data
Managing Validators
Once the network is running, you can dynamically manage the validator set by adding, removing, or updating validators without restarting the network.
PoA Module
Emerald uses a Proof of Authority (PoA) smart contract (ValidatorManager) to manage the validator set. This contract is deployed at a predefined address (0x0000000000000000000000000000000000002000) and controls:
- Which validators are active
- Each validator’s voting power
- Who can modify the validator set (the contract owner)
Emerald’s PoA tooling provides support for the following use cases.
- Testing validator changes. Simulate adding/removing validators in a running network
- Testing voting power. Experiment with different power distributions
- Integration testing. Test how your application handles validator set changes
- Learning. Understand how dynamic validator management works
Prerequisites
- Running testnet (see Create a New Network)
- RPC endpoint (default
http://127.0.0.1:8645) - Contract owner key (see below for default test key)
Testnet Accounts
The local testnet uses a well-known test mnemonic for pre-funded accounts.
Mnemonic: test test test test test test test test test test test junk
PoA Contract Owner (Account #0):
- Private Key:
0xac0974bec39a17e36ba4a6b4d238ff944bacb478cbed5efcae784d7bf4f2ff80 - Address:
0xf39Fd6e51aad88F6F4ce6aB8827279cffFb92266 - Role: Has authority to add/remove/update validators
Validator Keys:
- Located at
nodes/{0,1,2,3}/config/priv_validator_key.json - These are separate from the Ethereum accounts
- Used for consensus signing, not transactions
Important
These keys are for testing only. Never use them on public networks or with real funds.
List Current Validators
View all registered validators and their voting power:
cargo run --bin emerald-utils poa -r http://127.0.0.1:8645 list
Output:
Total validators: 4

Validator #1:
  Power: 100
  Pubkey: 04681eaaa34e491e6c8335abc9ea92b024ef52eb91442ca3b84598c79a79f31b75...
  Validator address: 0x1234567890abcdef...

Validator #2:
  Power: 100
  ...
Add a Validator
To add a node to the validator set, you need the node’s public key. There are two options:
-
Use one of the existing validators after removing it from the validator set.
-
Add a new node using the following command:
# replace ID with a specific node ID (e.g., 4)
cargo run --bin emerald -- init --home nodes/{ID}
To get the node’s public key, run the following command.
# replace ID with a specific node ID (e.g., 4)
cargo run --bin emerald show-pubkey \
  nodes/{ID}/config/priv_validator_key.json
Then run the following command, replacing the placeholder values.
cargo run --bin emerald-utils poa -r http://127.0.0.1:8645 add-validator \
  --validator-pubkey <PUBKEY> \
  --power 100 \
  --owner-private-key 0xac0974bec39a17e36ba4a6b4d238ff944bacb478cbed5efcae784d7bf4f2ff80
Parameters:
--validator-pubkey: Uncompressed secp256k1 public key (65 bytes with0x04prefix, or 64 bytes raw)--power: Voting weight (default: 100)--owner-private-key: Private key of the ValidatorManager contract owner
Optional flags:
--rpc-url: RPC endpoint (default:http://127.0.0.1:8645)--contract-address: ValidatorManager address (default:0x0000000000000000000000000000000000002000)
Remove a Validator
To remove a validator from the active set:
cargo run --bin emerald-utils poa -r http://127.0.0.1:8645 remove-validator \
  --validator-pubkey 0x04681eaaa34e491e6c8335abc9ea92b024ef52eb91442ca3b84598c79a79f31b75... \
  --owner-private-key 0xac0974bec39a17e36ba4a6b4d238ff944bacb478cbed5efcae784d7bf4f2ff80
Update Validator Power
To change a validator’s voting weight:
cargo run --bin emerald-utils poa -r http://127.0.0.1:8645 update-validator \
  --validator-pubkey 0x04681eaaa34e491e6c8335abc9ea92b024ef52eb91442ca3b84598c79a79f31b75... \
  --power 200 \
  --owner-private-key 0xac0974bec39a17e36ba4a6b4d238ff944bacb478cbed5efcae784d7bf4f2ff80
Network Configuration
Default Addresses
- ValidatorManager Contract:
0x0000000000000000000000000000000000002000 - RPC Endpoints:
- Node 0:
http://127.0.0.1:8645(primary endpoint for most operations) - Node 1:
http://127.0.0.1:8745 - Node 2:
http://127.0.0.1:8845 - Node 3:
http://127.0.0.1:8945
- Node 0:
Note
All nodes share the same blockchain state. You can connect to any endpoint, but
:8645is typically used as the default.
Genesis Validators
The genesis file is generated with four initial validators, each with power 100. Validator public keys are extracted from nodes/{0,1,2,3}/config/priv_validator_key.json.
Pre-funded Test Accounts
The genesis file pre-funds accounts from the test mnemonic with ETH for testing. Use these accounts for sending transactions, deploying contracts, or testing.
Use the anvil command to get a list of the pre-funded accounts.
anvil
Available Accounts
==================

(0) 0xf39Fd6e51aad88F6F4ce6aB8827279cffFb92266 (10000.000000000000000000 ETH)
(1) 0x70997970C51812dc3A010C7d01b50e0d17dc79C8 (10000.000000000000000000 ETH)
(2) 0x3C44CdDdB6a900fa2b585dd299e03d12FA4293BC (10000.000000000000000000 ETH)
(3) 0x90F79bf6EB2c4f870365E785982E1f101E93b906 (10000.000000000000000000 ETH)
(4) 0x15d34AAf54267DB7D7c367839AAf71A00a2C6A65 (10000.000000000000000000 ETH)
(5) 0x9965507D1a55bcC2695C58ba16FB37d819B0A4dc (10000.000000000000000000 ETH)
(6) 0x976EA74026E726554dB657fA54763abd0C3a0aa9 (10000.000000000000000000 ETH)
(7) 0x14dC79964da2C08b23698B3D3cc7Ca32193d9955 (10000.000000000000000000 ETH)
(8) 0x23618e81E3f5cdF7f54C3d65f7FBc0aBf5B21E8f (10000.000000000000000000 ETH)
(9) 0xa0Ee7A142d267C1f36714E4a8F75612F20a79720 (10000.000000000000000000 ETH)

Private Keys
==================

(0) 0xac0974bec39a17e36ba4a6b4d238ff944bacb478cbed5efcae784d7bf4f2ff80
(1) 0x59c6995e998f97a5a0044966f0945389dc9e86dae88c7a8412f4603b6b78690d
(2) 0x5de4111afa1a4b94908f83103eb1f1706367c2e68ca870fc3fb9a804cdab365a
(3) 0x7c852118294e51e653712a81e05800f419141751be58f605c371e15141b007a6
(4) 0x47e179ec197488593b187f80a00eb0da91f1b9d0b13f8733639f19c30a34926a
(5) 0x8b3a350cf5c34c9194ca85829a2df0ec3153be0318b5e2d3348e872092edffba
(6) 0x92db14e403b83dfe3df233f83dfa3a0d7096f21ca9b0d6d6b8d88b2b4ec1564e
(7) 0x4bbbf85ce3377467afe5d46f804f221813b2bb87f24d81f60f1fcdbf7cbf4356
(8) 0xdbda1821b80551c9d65939329250298aa3472ba22feea921c0cf5d620ea67b97
(9) 0x2a871d0798f97d79848a013d4936a73bf4cc922c825d33c1cf7073dff6d409c6

Wallet
==================
Mnemonic:          test test test test test test test test test test test junk
Derivation path:   m/44'/60'/0'/0/
Alternatively, use the following command and vary the --mnemonic-index (one value in 0-9):
cast wallet address --mnemonic-index 0 --mnemonic "test test test test test test test test test test test junk"

# output: 0xf39Fd6e51aad88F6F4ce6aB8827279cffFb92266
Interacting With the Testnet
Once your local Emerald testnet is running, you can interact with it like any Ethereum network.
Using curl (JSON-RPC)
Get current block number:
curl -X POST http://127.0.0.1:8645 \
  -H "Content-Type: application/json" \
  -d '{"jsonrpc":"2.0","method":"eth_blockNumber","params":[],"id":1}'
Get account balance:
curl -X POST http://127.0.0.1:8645 \
  -H "Content-Type: application/json" \
  -d '{"jsonrpc":"2.0","method":"eth_getBalance","params":["0xf39Fd6e51aad88F6F4ce6aB8827279cffFb92266","latest"],"id":1}'
Send a transaction:
curl -X POST http://127.0.0.1:8645 \
  -H "Content-Type: application/json" \
  -d '{
    "jsonrpc":"2.0",
    "method":"eth_sendTransaction",
    "params":[{
      "from":"0xf39Fd6e51aad88F6F4ce6aB8827279cffFb92266",
      "to":"0x70997970C51812dc3A010C7d01b50e0d17dc79C8",
      "value":"0x1000000000000000000",
      "gas":"0x5208"
    }],
    "id":1
  }'
Using cast (Foundry)
Prerequisite: Foundry
Get block number:
cast block-number --rpc-url http://127.0.0.1:8645
Check balance:
cast balance 0xf39Fd6e51aad88F6F4ce6aB8827279cffFb92266 --rpc-url http://127.0.0.1:8645
Send ETH:
cast send 0x70997970C51812dc3A010C7d01b50e0d17dc79C8 \
  --value 1ether \
  --private-key 0xac0974bec39a17e36ba4a6b4d238ff944bacb478cbed5efcae784d7bf4f2ff80 \
  --rpc-url http://127.0.0.1:8645
Using Web3 Libraries
Configure your Web3 library to connect to http://127.0.0.1:8645:
ethers.js (JavaScript):
const { ethers } = require('ethers');

const provider = new ethers.JsonRpcProvider('http://127.0.0.1:8645');
const wallet = new ethers.Wallet('0xac0974bec39a17e36ba4a6b4d238ff944bacb478cbed5efcae784d7bf4f2ff80', provider);

// Send transaction
const tx = await wallet.sendTransaction({
  to: '0x70997970C51812dc3A010C7d01b50e0d17dc79C8',
  value: ethers.parseEther('1.0')
});
await tx.wait();
web3.py (Python):
from web3 import Web3

w3 = Web3(Web3.HTTPProvider('http://127.0.0.1:8645'))
account = w3.eth.account.from_key('0xac0974bec39a17e36ba4a6b4d238ff944bacb478cbed5efcae784d7bf4f2ff80')

# Send transaction
tx = {
    'to': '0x70997970C51812dc3A010C7d01b50e0d17dc79C8',
    'value': w3.to_wei(1, 'ether'),
    'gas': 21000,
    'gasPrice': w3.eth.gas_price,
    'nonce': w3.eth.get_transaction_count(account.address),
}
signed_tx = account.sign_transaction(tx)
tx_hash = w3.eth.send_raw_transaction(signed_tx.rawTransaction)
Using MetaMask
- Open MetaMask and click on the network dropdown
- Click “Add Network” → “Add a network manually”
- Enter the following details:
- Network Name: Emerald Local
- RPC URL:
http://127.0.0.1:8645 - Chain ID:
12345(or whatever you set in genesis) - Currency Symbol: ETH
- Click “Save”
- Import one of the test accounts using its private key
Warning
Only use test private keys with local networks. Never import test keys into wallets used for real funds.
Monitoring
The make testnet-start command automatically starts monitoring services to help you observe network behavior.
Grafana - Metrics Visualization
URL: http://localhost:4000
Grafana provides visual dashboards for monitoring validator and network metrics.
Default credentials:
- Username:
admin - Password:
admin(you’ll be prompted to change this on first login, but you can skip it for local testing)
What to monitor:
- Block production rate: Are validators producing blocks consistently?
- Consensus metrics: Round times, vote counts, proposal statistics
- Node health: CPU, memory, disk usage
- Network metrics: Peer connections, message rates
Tip: If you don’t see data immediately, wait 30-60 seconds for metrics to accumulate.
Prometheus - Raw Metrics
URL: http://localhost:9090
Prometheus collects time-series metrics from all nodes. Use the query interface to explore raw metrics data.
Useful queries:
emerald_consensus_height- Current consensus height per nodeemerald_consensus_round- Current consensus roundemerald_mempool_size- Number of transactions in mempoolprocess_cpu_seconds_total- CPU usage per process
When to use Prometheus:
- Creating custom queries
- Debugging specific metric issues
- Exporting data for analysis
Otterscan - Block Explorer
URL: http://localhost:80
Otterscan is a lightweight block explorer for inspecting blocks, transactions, and accounts.
Features:
- View recent blocks and transactions
- Search by address, transaction hash, or block number
- Inspect contract interactions
- View account balances and transaction history
Use cases:
- Verify transactions were included in blocks
- Debug smart contract interactions
- Inspect validator activity
- View network state
Emerald Node Logs
View consensus logs for each validator:
# View logs from validator 0
tail -f nodes/0/emerald.log

# View logs from all validators simultaneously
tail -f nodes/{0,1,2,3}/emerald.log
What to look for:
- Block proposals and commits
- Consensus round progression
- Validator voting activity
- Any errors or warnings
Docker Container Logs
View Reth execution client logs:
# View logs from Reth node 0
docker compose logs -f reth0

# View all Reth logs
docker compose logs -f reth0 reth1 reth2 reth3
What to look for:
- Block execution confirmations
- Transaction processing
- Peer connection status
- Engine API communication with Emerald
Troubleshooting
Network Won’t Start
-
Check if ports are in use
lsof -i :8545 # RPC port lsof -i :30303 # P2P port -
View Docker logs
docker compose logs reth0 docker compose logs reth1 -
Verify genesis file exists
ls -la assets/genesis.json -
Check emerald logs
tail -f nodes/0/emerald.log
Validator Operations Fail
-
Verify network is running
curl -X POST http://127.0.0.1:8545 \ -H "Content-Type: application/json" \ -d '{"jsonrpc":"2.0","method":"eth_blockNumber","params":[],"id":1}' -
Check validator public key format
- Must be hex-encoded secp256k1 public key
- Can be 64 bytes (raw) or 65 bytes (with
0x04prefix) - Include
0xprefix
-
Verify contract owner key
- Default:
0xac0974bec39a17e36ba4a6b4d238ff944bacb478cbed5efcae784d7bf4f2ff80
- Default:
Public Key Extraction
To get a validator’s public key from their private key file:
cargo run --bin emerald show-pubkey \
  nodes/0/config/priv_validator_key.json
Cannot Connect to Docker
When using Docker Desktop, ensure that Enable host networking is turned on in the Docker Desktop settings. This option allows the containers to bind correctly to the host machine’s network interface, ensuring the Reth nodes and the monitoring services are reachable on the expected ports.
Common Workflows
Here are some typical workflows for using the local testnet during development.
Smart Contract Deployment
-
Start the network:
make testnet-start -
Deploy your contract using Foundry:
forge create src/MyContract.sol:MyContract \ --rpc-url http://127.0.0.1:8545 \ --private-key 0xac0974bec39a17e36ba4a6b4d238ff944bacb478cbed5efcae784d7bf4f2ff80 -
Verify in Otterscan:
- Open http://localhost:80
- Search for the contract address
- View deployment transaction and contract state
-
Interact with the contract:
cast call <CONTRACT_ADDRESS> "myFunction()" --rpc-url http://127.0.0.1:8545
Validator Set Changes
-
Start the network:
make testnet-start -
Check initial validator set:
cargo run --bin emerald-utils poa list -
Create a new validator key:
# replace ID with a specific node ID (e.g., 4) cargo run --bin emerald -- init --home nodes/{ID} -
Get the public key:
# replace ID with a specific node ID (e.g., 4) cargo run --bin emerald show-pubkey nodes/{ID}/config/priv_validator_key.json -
Add the validator to the network:
cargo run --bin emerald-utils poa add-validator \ --validator-pubkey <PUBKEY> \ --power 100 \ --owner-private-key 0xac0974bec39a17e36ba4a6b4d238ff944bacb478cbed5efcae784d7bf4f2ff80 -
Verify the change:
cargo run --bin emerald-utils poa list -
Start the new validator node (manual process, see node configuration)
Testing Under Load
-
Start the network:
make testnet-start -
Run the transaction spammer:
emerald-utils spam --chain-id 12345 \ --rpc-url http://127.0.0.1:8645 \ --rate 10 \ --duration 60 -
Monitor performance in Grafana:
- Open http://localhost:4000
- Watch block production rate
- Monitor transaction processing time
- Check for any consensus delays
-
Check mempool and logs:
# Check mempool size
curl -X POST http://127.0.0.1:8645 \
  -H "Content-Type: application/json" \
  -d '{"jsonrpc":"2.0","method":"txpool_status","params":[],"id":1}'

# Watch validator logs
tail -f nodes/0/emerald.log
Application Integration
-
Start the network:
make testnet-start -
Configure your application to use:
- RPC URL:
http://127.0.0.1:8645 - Chain ID:
12345 - Test account private key (from pre-funded accounts)
- RPC URL:
-
Run your application and verify:
- Transactions are submitted successfully
- Events are emitted and captured correctly
- State changes are reflected
-
Use Otterscan to debug any issues:
- View transaction details
- Check revert reasons
- Inspect logs and events
CLI (Work in Progress)
Note
The Emerald CLI is a work in progress and should be considered experimental. Functionality may change, and users should expect potential instability or incomplete features.
Start the Network
Use the following command to start a local testnet:
emerald testnet start
Generate testnet configuration (explicit) Start a complete testnet with Reth + Emerald nodes

Usage: emerald testnet start [OPTIONS]

Options:
      --home <HOME_DIR>
          Home directory for Malachite (default: `$HOME/.emerald-devnet`)
  -n, --nodes <NODES>
          Number of node pairs to create (max 20) [default: 3]
      --log-level <LOG_LEVEL>
          Log level (default: `malachite=debug`)
      --node-keys <NODE_KEYS>
          Private keys for validators (can be specified multiple times) Supports both hex format (0x...) and JSON format from init command
      --emerald-bin <EMERALD_BIN>
          Path to the `emerald` executable. The program first checks the path provided here; if the binary is not found, it will try to resolve `emerald` from $PATH instead [default: ./target/debug/emerald]
      --log-format <LOG_FORMAT>
          Log format (default: `plaintext`)
      --config <CONFIG_FILE>
          Emerald configuration file (default: `~/.emerald/config/config.toml`)
      --emerald-utils-bin <EMERALD_UTILS_BIN>
          Path to the `emerald-utils` executable. The program first checks the path provided here; if the binary is not found, it will try to resolve `emerald-utils` from $PATH instead [default: ./target/debug/emerald-utils]
      --custom-reth-bin <CUSTOM_RETH_BIN>
          Path to the `custom-reth` executable. The program first checks the path provided here; if the binary is not found, it will try to resolve `custom-reth` from $PATH instead [default: ./custom-reth/target/debug/custom-reth]
      --reth-config-path <RETH_CONFIG_PATH>
          Path to reth node spawning configurations. If not specified will use default values
      --fee-receiver <FEE_RECEIVER>
          Address which will receive fees. If not specified will default to `0x4242424242424242424242424242424242424242`
  -h, --help
          Print help
For example, starting a testnet with four nodes results in the following output:
Output for emerald testnet start -n 4
Checking custom-reth installation... ✓ Reth Version: 1.9.2-dev

📝 Generating testnet configuration...
2025-12-02T10:10:54.667684Z  INFO Generating configuration for node... id=0 home=$HOME/.emerald-devnet/0 emerald_config=$HOME/.emerald-devnet/0/config/emerald.toml
2025-12-02T10:10:54.668378Z  INFO Generating configuration for node... id=1 home=$HOME/.emerald-devnet/1 emerald_config=$HOME/.emerald-devnet/1/config/emerald.toml
2025-12-02T10:10:54.668769Z  INFO Generating configuration for node... id=2 home=$HOME/.emerald-devnet/2 emerald_config=$HOME/.emerald-devnet/2/config/emerald.toml
2025-12-02T10:10:54.669118Z  INFO Generating configuration for node... id=3 home=$HOME/.emerald-devnet/3 emerald_config=$HOME/.emerald-devnet/3/config/emerald.toml
✓ Configuration generated

📦 Setting up assets directory...
✓ Assets directory set up

⚙️  Generating Emerald configs...
2025-12-02T10:10:54.669560Z  INFO Will use address `2A2A2A2A2A2A2A2A2A2A2A2A2A2A2A2A2A2A2A2A` as Fee Receiver address
✓ Emerald configs generated

🔑 Extracting validator public keys...
2025-12-02T10:10:54.669860Z  INFO Using `./target/debug/emerald` for Emerald binary when extracting public keys
2025-12-02T10:10:54.676766Z  INFO Using `./target/debug/emerald` for Emerald binary when extracting public keys
2025-12-02T10:10:54.682883Z  INFO Using `./target/debug/emerald` for Emerald binary when extracting public keys
2025-12-02T10:10:54.689414Z  INFO Using `./target/debug/emerald` for Emerald binary when extracting public keys
✓ Public keys extracted

⚙️  Generating genesis file...
  Using emerald-utils from: ./target/debug/emerald-utils
✓ Genesis file created

🔗 Starting Reth execution clients...
  Starting Reth node 0... Starting Reth node 0 on ports:
  HTTP: 8645
  AuthRPC: 8647
  Metrics: 8648
  P2P: 8649
  Logs: $HOME/.emerald-devnet/0/logs/reth.log
✓ (PID: 64655)
  Starting Reth node 1... Starting Reth node 1 on ports:
  HTTP: 8675
  AuthRPC: 8677
  Metrics: 8678
  P2P: 8679
  Logs: $HOME/.emerald-devnet/1/logs/reth.log
✓ (PID: 64678)
  Starting Reth node 2... Starting Reth node 2 on ports:
  HTTP: 8705
  AuthRPC: 8707
  Metrics: 8708
  P2P: 8709
  Logs: $HOME/.emerald-devnet/2/logs/reth.log
✓ (PID: 64693)
  Starting Reth node 3... Starting Reth node 3 on ports:
  HTTP: 8735
  AuthRPC: 8737
  Metrics: 8738
  P2P: 8739
  Logs: $HOME/.emerald-devnet/3/logs/reth.log
✓ (PID: 64706)
✓ All Reth nodes started

⏳ Waiting for Reth nodes to initialize...
  Waiting for Reth node 0 to be ready... ✓
  Waiting for Reth node 1 to be ready... ✓
  Waiting for Reth node 2 to be ready... ✓
  Waiting for Reth node 3 to be ready... ✓
✓ All Reth nodes ready

🔗 Connecting Reth peers...
  Getting enode for Reth node 0... ✓
  Getting enode for Reth node 1... ✓
  Getting enode for Reth node 2... ✓
  Getting enode for Reth node 3... ✓
  Connecting node 0 -> 1... ✓
  Connecting node 0 -> 2... ✓
  Connecting node 0 -> 3... ✓
  Connecting node 1 -> 0... ✓
  Connecting node 1 -> 2... ✓
  Connecting node 1 -> 3... ✓
  Connecting node 2 -> 0... ✓
  Connecting node 2 -> 1... ✓
  Connecting node 2 -> 3... ✓
  Connecting node 3 -> 0... ✓
  Connecting node 3 -> 1... ✓
  Connecting node 3 -> 2... ✓
✓ Reth peers connected

💎 Starting Emerald consensus nodes...
  Starting Emerald node 0... 2025-12-02T10:10:57.694008Z  INFO Using `./target/debug/emerald` for Emerald binary to spawn node
✓ (PID: 64731)
  Starting Emerald node 1... 2025-12-02T10:10:58.303003Z  INFO Using `./target/debug/emerald` for Emerald binary to spawn node
✓ (PID: 64744)
  Starting Emerald node 2... 2025-12-02T10:10:58.914034Z  INFO Using `./target/debug/emerald` for Emerald binary to spawn node
✓ (PID: 64757)
  Starting Emerald node 3... 2025-12-02T10:10:59.520426Z  INFO Using `./target/debug/emerald` for Emerald binary to spawn node
✓ (PID: 64780)
✓ All Emerald nodes started

✅ Testnet started successfully!

📊 Status:
  Reth processes: 4 running
  Emerald processes: 4 running

📁 Logs:
  Reth: $HOME/.emerald-devnet/{0..3}/logs/reth.log
  Emerald: $HOME/.emerald-devnet/{0..3}/logs/emerald.log

💡 Commands:
    emerald testnet status           - Check status of all nodes
    emerald testnet stop-node <id>   - Stop a specific node
    emerald testnet stop             - Stop all nodes
    emerald testnet destroy          - Remove all testnet data
Check Network Status
Use the following command to check the network status:
emerald testnet status
Show status of all nodes in the testnet

Usage: emerald testnet status [OPTIONS]

Options:
      --home <HOME_DIR>          Home directory for Malachite (default: `$HOME/.emerald-devnet`)
      --log-level <LOG_LEVEL>    Log level (default: `malachite=debug`)
      --log-format <LOG_FORMAT>  Log format (default: `plaintext`)
      --config <CONFIG_FILE>     Emerald configuration file (default: `~/.emerald/config/config.toml`)
  -h, --help
For example, checking the status after having started a four-node testnet should results in the following output:
Output for emerald testnet status
📊 Testnet Status
Looking for nodes in: $HOME/.emerald-devnet

Node 0:
  Emerald: Running (PID: 64731)
  Reth:    Running (PID: 64655)
  Height:  51
  Peers:   3

Node 1:
  Emerald: Running (PID: 64744)
  Reth:    Running (PID: 64678)
  Height:  51
  Peers:   3

Node 2:
  Emerald: Running (PID: 64757)
  Reth:    Running (PID: 64693)
  Height:  50
  Peers:   3

Node 3:
  Emerald: Running (PID: 64780)
  Reth:    Running (PID: 64706)
  Height:  51
  Peers:   3

Summary:
  Total nodes:    4
  Emerald running: 4/4
  Reth running:    4/4
Stop Node
Use the following command to stop a single node:
emerald testnet stop-node $NODE_ID
Stop an existing running node by ID

Usage: emerald testnet stop-node [OPTIONS] <NODE_ID>

Arguments:
  <NODE_ID>  Node ID to stop

Options:
      --home <HOME_DIR>          Home directory for Malachite (default: `$HOME/.emerald-devnet`)
      --log-level <LOG_LEVEL>    Log level (default: `malachite=debug`)
      --log-format <LOG_FORMAT>  Log format (default: `plaintext`)
      --config <CONFIG_FILE>     Emerald configuration file (default: `~/.emerald/config/config.toml`)
  -h, --help                     Print help
For example, running this command for Node 1 should results in the following output:
Output for emerald stop-node 1
🛑 Stopping node 1...
  Stopping Reth process (PID: 64678)... ✓
  Stopping Emerald process (PID: 64744)... ✓

✅ Stopped 2 process(es) for node 1
And checking the network status should results in the following output:
Output for emerald status
📊 Testnet Status
Looking for nodes in: $HOME/.emerald-devnet

Node 0:
  Emerald: Running (PID: 64731)
  Reth:    Running (PID: 64655)
  Height:  173
  Peers:   2

Node 1:
  Emerald: Not started
  Reth:    Not started

Node 2:
  Emerald: Running (PID: 64757)
  Reth:    Running (PID: 64693)
  Height:  173
  Peers:   2

Node 3:
  Emerald: Running (PID: 64780)
  Reth:    Running (PID: 64706)
  Height:  173
  Peers:   2

Summary:
  Total nodes:    4
  Emerald running: 3/4
  Reth running:    3/4
Restart Node
Use the following command to restart an existing node:
emerald testnet start-node $NODE_ID
Restart an existing stopped node by ID

Usage: emerald testnet start-node [OPTIONS] <NODE_ID>

Arguments:
  <NODE_ID>  Node ID to start

Options:
      --emerald-bin <EMERALD_BIN>
          Path to the `emerald` executable. The program first checks the path provided here; if the binary is not found, it will try to resolve `emerald` from $PATH instead [default: ./target/debug/emerald]
      --home <HOME_DIR>
          Home directory for Malachite (default: `$HOME/.emerald-devnet`)
      --custom-reth-bin <CUSTOM_RETH_BIN>
          Path to the `custom-reth` executable. The program first checks the path provided here; if the binary is not found, it will try to resolve `custom-reth` from $PATH instead [default: ./custom-reth/target/debug/custom-reth]
      --log-level <LOG_LEVEL>
          Log level (default: `malachite=debug`)
      --log-format <LOG_FORMAT>
          Log format (default: `plaintext`)
      --reth-config-path <RETH_CONFIG_PATH>
          Path to reth node spawning configurations. If not specified will use default values
      --config <CONFIG_FILE>
          Emerald configuration file (default: `~/.emerald/config/config.toml`)
  -h, --help
          Print help
For example, restarting the node that was previously stopped should results in the following output:
Output for emerald start-node 1
🚀 Starting node 1...
Checking custom-reth installation... ✓ Reth Version: 1.9.2-dev

🔗 Starting Reth execution client...
Starting Reth node 1 on ports:
  HTTP: 8675
  AuthRPC: 8677
  Metrics: 8678
  P2P: 8679
  Logs: $HOME/.emerald-devnet/1/logs/reth.log
✓ Reth node started (PID: 66177)

⏳ Waiting for Reth node to initialize...
✓ Reth node ready

🔗 Connecting to existing peers...
  Connecting to node 0... ✓
  Connecting to node 3... ✓
  Connecting to node 2... ✓
✓ Connected to peers

💎 Starting Emerald consensus node...
2025-12-02T10:13:12.137314Z  INFO Using `./target/debug/emerald` for Emerald binary to spawn node
✓ Emerald node started (PID: 66192)

✅ Node 1 started successfully!

📁 Logs:
  Reth: $HOME/.emerald-devnet/1/logs/reth.log
  Emerald: $HOME/.emerald-devnet/1/logs/emerald.log
And checking the network status should results in the following output:
Output for emerald status
📊 Testnet Status
Looking for nodes in: $HOME/.emerald-devnet

Node 0:
  Emerald: Running (PID: 64731)
  Reth:    Running (PID: 64655)
  Height:  197
  Peers:   3

Node 1:
  Emerald: Running (PID: 66192)
  Reth:    Running (PID: 66177)
  Height:  173
  Peers:   3

Node 2:
  Emerald: Running (PID: 64757)
  Reth:    Running (PID: 64693)
  Height:  197
  Peers:   3

Node 3:
  Emerald: Running (PID: 64780)
  Reth:    Running (PID: 64706)
  Height:  197
  Peers:   3

Summary:
  Total nodes:    4
  Emerald running: 4/4
  Reth running:    4/4
Add Node
Use the following command to add a new node to the network:
emerald testnet add-node
Add a new node to an existing testnet

Usage: emerald testnet add-node [OPTIONS]

Options:
      --emerald-bin <EMERALD_BIN>
          Path to the `emerald` executable. The program first checks the path provided here; if the binary is not found, it will try to resolve `emerald` from $PATH instead [default: ./target/debug/emerald]
      --home <HOME_DIR>
          Home directory for Malachite (default: `$HOME/.emerald-devnet`)
      --custom-reth-bin <CUSTOM_RETH_BIN>
          Path to the `custom-reth` executable. The program first checks the path provided here; if the binary is not found, it will try to resolve `custom-reth` from $PATH instead [default: ./custom-reth/target/debug/custom-reth]
      --log-level <LOG_LEVEL>
          Log level (default: `malachite=debug`)
      --log-format <LOG_FORMAT>
          Log format (default: `plaintext`)
      --reth-config-path <RETH_CONFIG_PATH>
          Path to reth node spawning configurations. If not specified will use default values
      --config <CONFIG_FILE>
          Emerald configuration file (default: `~/.emerald/config/config.toml`)
      --fee-receiver <FEE_RECEIVER>
          Address which will receive fees. If not specified will default to `0x4242424242424242424242424242424242424242`
  -h, --help
          Print help
Running this command should results in the following output:
Output for emerald add-node
📝 Adding non-validator node to testnet...

Checking custom-reth installation... ✓ Reth Version: 1.9.2-dev

📋 Next available node ID: 4

📁 Creating node directories...
✓ Node directories created

📋 Copying genesis file...
✓ Genesis file copied

⚙️  Generating Malachite config...
✓ Malachite config generated

⚙️  Generating Emerald config...
2025-12-02T10:13:59.649184Z  INFO Will use address `2A2A2A2A2A2A2A2A2A2A2A2A2A2A2A2A2A2A2A2A` as Fee Receiver address
✓ Emerald config generated

🔑 Generating private validator key...
2025-12-02T10:13:59.649684Z  INFO Using `./target/debug/emerald` for Emerald binary to generate private key
✓ Private validator key generated

🔗 Starting Reth execution client...
Starting Reth node 4 on ports:
  HTTP: 8765
  AuthRPC: 8767
  Metrics: 8768
  P2P: 8769
  Logs: $HOME/.emerald-devnet/4/logs/reth.log
✓ Reth node started (PID: 66756)

⏳ Waiting for Reth node to initialize...
✓ Reth node ready

🔗 Connecting to existing peers...
  Connecting to node 0... ✓
  Connecting to node 1... ✓
  Connecting to node 3... ✓
  Connecting to node 2... ✓
✓ Connected to peers

💎 Starting Emerald consensus node...
2025-12-02T10:14:00.785156Z  INFO Using `./target/debug/emerald` for Emerald binary when adding node
✓ Emerald node started (PID: 66771)

✅ Non-validator node 4 added successfully!

📁 Logs:
  Reth: $HOME/.emerald-devnet/4/logs/reth.log
  Emerald: $HOME/.emerald-devnet/4/logs/emerald.log
And checking the network status should results in the following output:
Output for emerald status
📊 Testnet Status
Looking for nodes in: $HOME/.emerald-devnet

Node 0:
  Emerald: Running (PID: 64731)
  Reth:    Running (PID: 64655)
  Height:  353
  Peers:   4

Node 1:
  Emerald: Running (PID: 66192)
  Reth:    Running (PID: 66177)
  Height:  353
  Peers:   4

Node 2:
  Emerald: Running (PID: 64757)
  Reth:    Running (PID: 64693)
  Height:  353
  Peers:   4

Node 3:
  Emerald: Running (PID: 64780)
  Reth:    Running (PID: 64706)
  Height:  353
  Peers:   4

Node 4:
  Emerald: Running (PID: 66771)
  Reth:    Running (PID: 66756)
  Height:  353
  Peers:   4

Summary:
  Total nodes:    5
  Emerald running: 5/5
  Reth running:    5/5
Set Node as Validator
If we now look at the list of validator we should only see 4 as we previously added a non-validator node.
Output for emerald-utils poa -r http://127.0.0.1:8645 list
POA Owner Address: 0xf39fd6e51aad88f6f4ce6ab8827279cfffb92266

Total validators: 4

Validator #1:
  Power: 100
  Pubkey: 04d8620dd478f043bd27fc9389ec6873410265cf8640cb636decd2f0a2ddad7aa5656e58f05b1596a9c737f7073211089c6b49ab7ad5bdb9ab55bf83741b3ee4e4
Validator address: 0x5a9245dce516aa85c8d82a90608a542a151d9e91

Validator #2:
  Power: 100
  Pubkey: 049b9fc5d66ec179df923dfbb083f2e846ff5da508650c77473c8427fafe481a5e73c1ad26bed12895108f463b84f6dd0d8ebbf4270a06e312a3b63295cffebbff
Validator address: 0x7d17aa4fe6c1e7c58d1b26f5a68c35be0bff6c29

Validator #3:
  Power: 100
  Pubkey: 04317052004566d1d2ac0b3161313646412f93275599eb6455302a050352027905346eb4a0eebce874c35b1cd29bb5472c46eb2fd9ed24e57c2b73b85b59729e36
Validator address: 0x311e280d2918e93a90eea22c0773053f325ce409

Validator #4:
  Power: 100
  Pubkey: 049cdba83f09fd9f66cf5b45ce3db1866c85ce0041f0dcb3d64070196fc38690acc00c0dafa3289404b5615986e467720cf43ab970cc14c4f1f1a07774a992b3e0
Validator address: 0xe95eaa9dcd4f9e3b4eec820355c03b4f4499ab87
To add the new node as a validator, we first need to get its public key.
Output for emerald show-pubkey $HOME/.emerald-devnet/4/config/priv_validator_key.json
0x670252bba7f17bfa44ed4148aee562108a57f49e90017f940d80bd4a34e367710c192ed04ad87a71f6c3cff5d48b1baab8f423c01f534a01dee18b151b25a0f7
Once we have the public key, we can add the new node to the validator set using the following command:
emerald-utils poa -r http://127.0.0.1:8645 add-validator \
  --validator-pubkey 0x670252bba7f17bfa44ed4148aee562108a57f49e90017f940d80bd4a34e367710c192ed04ad87a71f6c3cff5d48b1baab8f423c01f534a01dee18b151b25a0f7 \
  --power 100 \
  --owner-private-key 0xac0974bec39a17e36ba4a6b4d238ff944bacb478cbed5efcae784d7bf4f2ff80
Output for
emerald-utils poa -r http://127.0.0.1:8645 add-validator
Adding validator with pubkey: 0x670252bba7f17bfa44ed4148aee562108a57f49e90017f940d80bd4a34e367710c192ed04ad87a71f6c3cff5d48b1baab8f423c01f534a01dee18b151b25a0f7
  Power: 100
Transaction sent: 0xe1796369404585429fa24300d8f1f5433c8e5b477c992f1bd23e39d6c7de0ab6
Transaction confirmed in block: Some(466)
Gas used: 153301
And listing the validators should results in the following output:
Output for emerald-utils poa -r http://127.0.0.1:8645 list
POA Owner Address: 0xf39fd6e51aad88f6f4ce6ab8827279cfffb92266

Total validators: 5

Validator #1:
  Power: 100
  Pubkey: 04d8620dd478f043bd27fc9389ec6873410265cf8640cb636decd2f0a2ddad7aa5656e58f05b1596a9c737f7073211089c6b49ab7ad5bdb9ab55bf83741b3ee4e4
Validator address: 0x5a9245dce516aa85c8d82a90608a542a151d9e91

Validator #2:
  Power: 100
  Pubkey: 049b9fc5d66ec179df923dfbb083f2e846ff5da508650c77473c8427fafe481a5e73c1ad26bed12895108f463b84f6dd0d8ebbf4270a06e312a3b63295cffebbff
Validator address: 0x7d17aa4fe6c1e7c58d1b26f5a68c35be0bff6c29

Validator #3:
  Power: 100
  Pubkey: 04317052004566d1d2ac0b3161313646412f93275599eb6455302a050352027905346eb4a0eebce874c35b1cd29bb5472c46eb2fd9ed24e57c2b73b85b59729e36
Validator address: 0x311e280d2918e93a90eea22c0773053f325ce409

Validator #4:
  Power: 100
  Pubkey: 049cdba83f09fd9f66cf5b45ce3db1866c85ce0041f0dcb3d64070196fc38690acc00c0dafa3289404b5615986e467720cf43ab970cc14c4f1f1a07774a992b3e0
Validator address: 0xe95eaa9dcd4f9e3b4eec820355c03b4f4499ab87

Validator #5:
  Power: 100
  Pubkey: 04670252bba7f17bfa44ed4148aee562108a57f49e90017f940d80bd4a34e367710c192ed04ad87a71f6c3cff5d48b1baab8f423c01f534a01dee18b151b25a0f7
Validator address: 0x42dccf7844765f8205edbe4364d69d955fd1330a
For more details on interacting with the PoA Module, see Managing Validators section.
Stop the Network
Use the following command to stop the local testnet:
emerald testnet stop
Stop all nodes in the testnet

Usage: emerald testnet stop [OPTIONS]

Options:
      --home <HOME_DIR>          Home directory for Malachite (default: `$HOME/.emerald-devnet`)
      --log-level <LOG_LEVEL>    Log level (default: `malachite=debug`)
      --log-format <LOG_FORMAT>  Log format (default: `plaintext`)
      --config <CONFIG_FILE>     Emerald configuration file (default: `~/.emerald/config/config.toml`)
  -h, --help                     Print help
Running this command should results in the following output:
Output for emerald testnet stop
🛑 Stopping all testnet nodes...

Stopping node 0...
  Stopping Reth (PID: 64655)... ✓
  Stopping Emerald (PID: 64731)... ✓
Stopping node 1...
  Stopping Reth (PID: 66177)... ✓
  Stopping Emerald (PID: 66192)... ✓
Stopping node 4...
  Stopping Reth (PID: 66756)... ✓
  Stopping Emerald (PID: 66771)... ✓
Stopping node 3...
  Stopping Reth (PID: 64706)... ✓
  Stopping Emerald (PID: 64780)... ✓
Stopping node 2...
  Stopping Reth (PID: 64693)... ✓
  Stopping Emerald (PID: 64757)... ✓

✅ Stopped 10/10 processes
Clean the Network
Use the following command to remove all testnet data:
emerald testnet destroy
Remove all testnet data

Usage: emerald testnet destroy [OPTIONS]

Options:
  -f, --force                    Skip confirmation prompt
      --home <HOME_DIR>          Home directory for Malachite (default: `$HOME/.emerald-devnet`)
      --log-level <LOG_LEVEL>    Log level (default: `malachite=debug`)
      --log-format <LOG_FORMAT>  Log format (default: `plaintext`)
      --config <CONFIG_FILE>     Emerald configuration file (default: `~/.emerald/config/config.toml`)
  -h, --help                     Print help
Running this command should results in the following output:
Output for emerald testnet destroy
⚠️  This will stop all nodes and permanently delete all testnet data at:
   $HOME/.emerald-devnet

   Are you sure? (y/N): y
🛑 Stopping all running nodes...

🗑️  Removing testnet data...
✅ Testnet data removed successfully
Launch Production Network
This guide is designed for network coordinator (companies, foundations, or organizations) that want to launch a new Emerald network.
Important
Emerald is under active development and should be used at your own risk. The software has not been externally audited, and its security and stability are not guaranteed.
Network coordinators are typically responsible for:
- Recruiting and onboarding external validators to participate in the network
- Collecting validator public keys from participants
- Generating and distributing network genesis files
- Coordinating network launch and operations
Starting a new network involves coordinating with external validator operators:
- Recruit Validators: Identify organizations or individuals who will run validator nodes on the network
- Distribute Instructions: Share the key generation steps with each validator (see Creating Network Genesis)
- Collect Public Keys: Each validator generates their private keys securely on their own infrastructure and provides the coordinate with their public key only
- Generate Genesis Files: Use the collected public keys to create the network genesis files
- Distribute Genesis Files: Share the genesis files with all validators so they can start their nodes
- Coordinate Launch: Ensure all validators start their nodes and connect to each other
Security Notes
- Validators should never share their private keys with anyone. They only provide their public keys for inclusion in the genesis file.
- Validators should ensure no ports are exposed to the internet and all traffic is secured with VPCs or VPN tunnels.
Roles and Responsibilities
| Task | Who Does It | What They Share |
|---|---|---|
| Generate validator private keys | Each validator (independently) | Nothing - keep private! |
| Extract and share public keys | Each validator | Public key only (0x…) |
| Collect all public keys | Network coordinator | N/A |
| Generate genesis files | Network coordinator | Genesis files to all validators |
| Generate PoA admin key | Network coordinator | Nothing - keep private! |
| Distribute genesis files | Network coordinator | Both genesis files to all |
| Configure and run Reth node | All participants | Peer connection info |
| Configure and run Emerald node | All participants | Peer connection info |
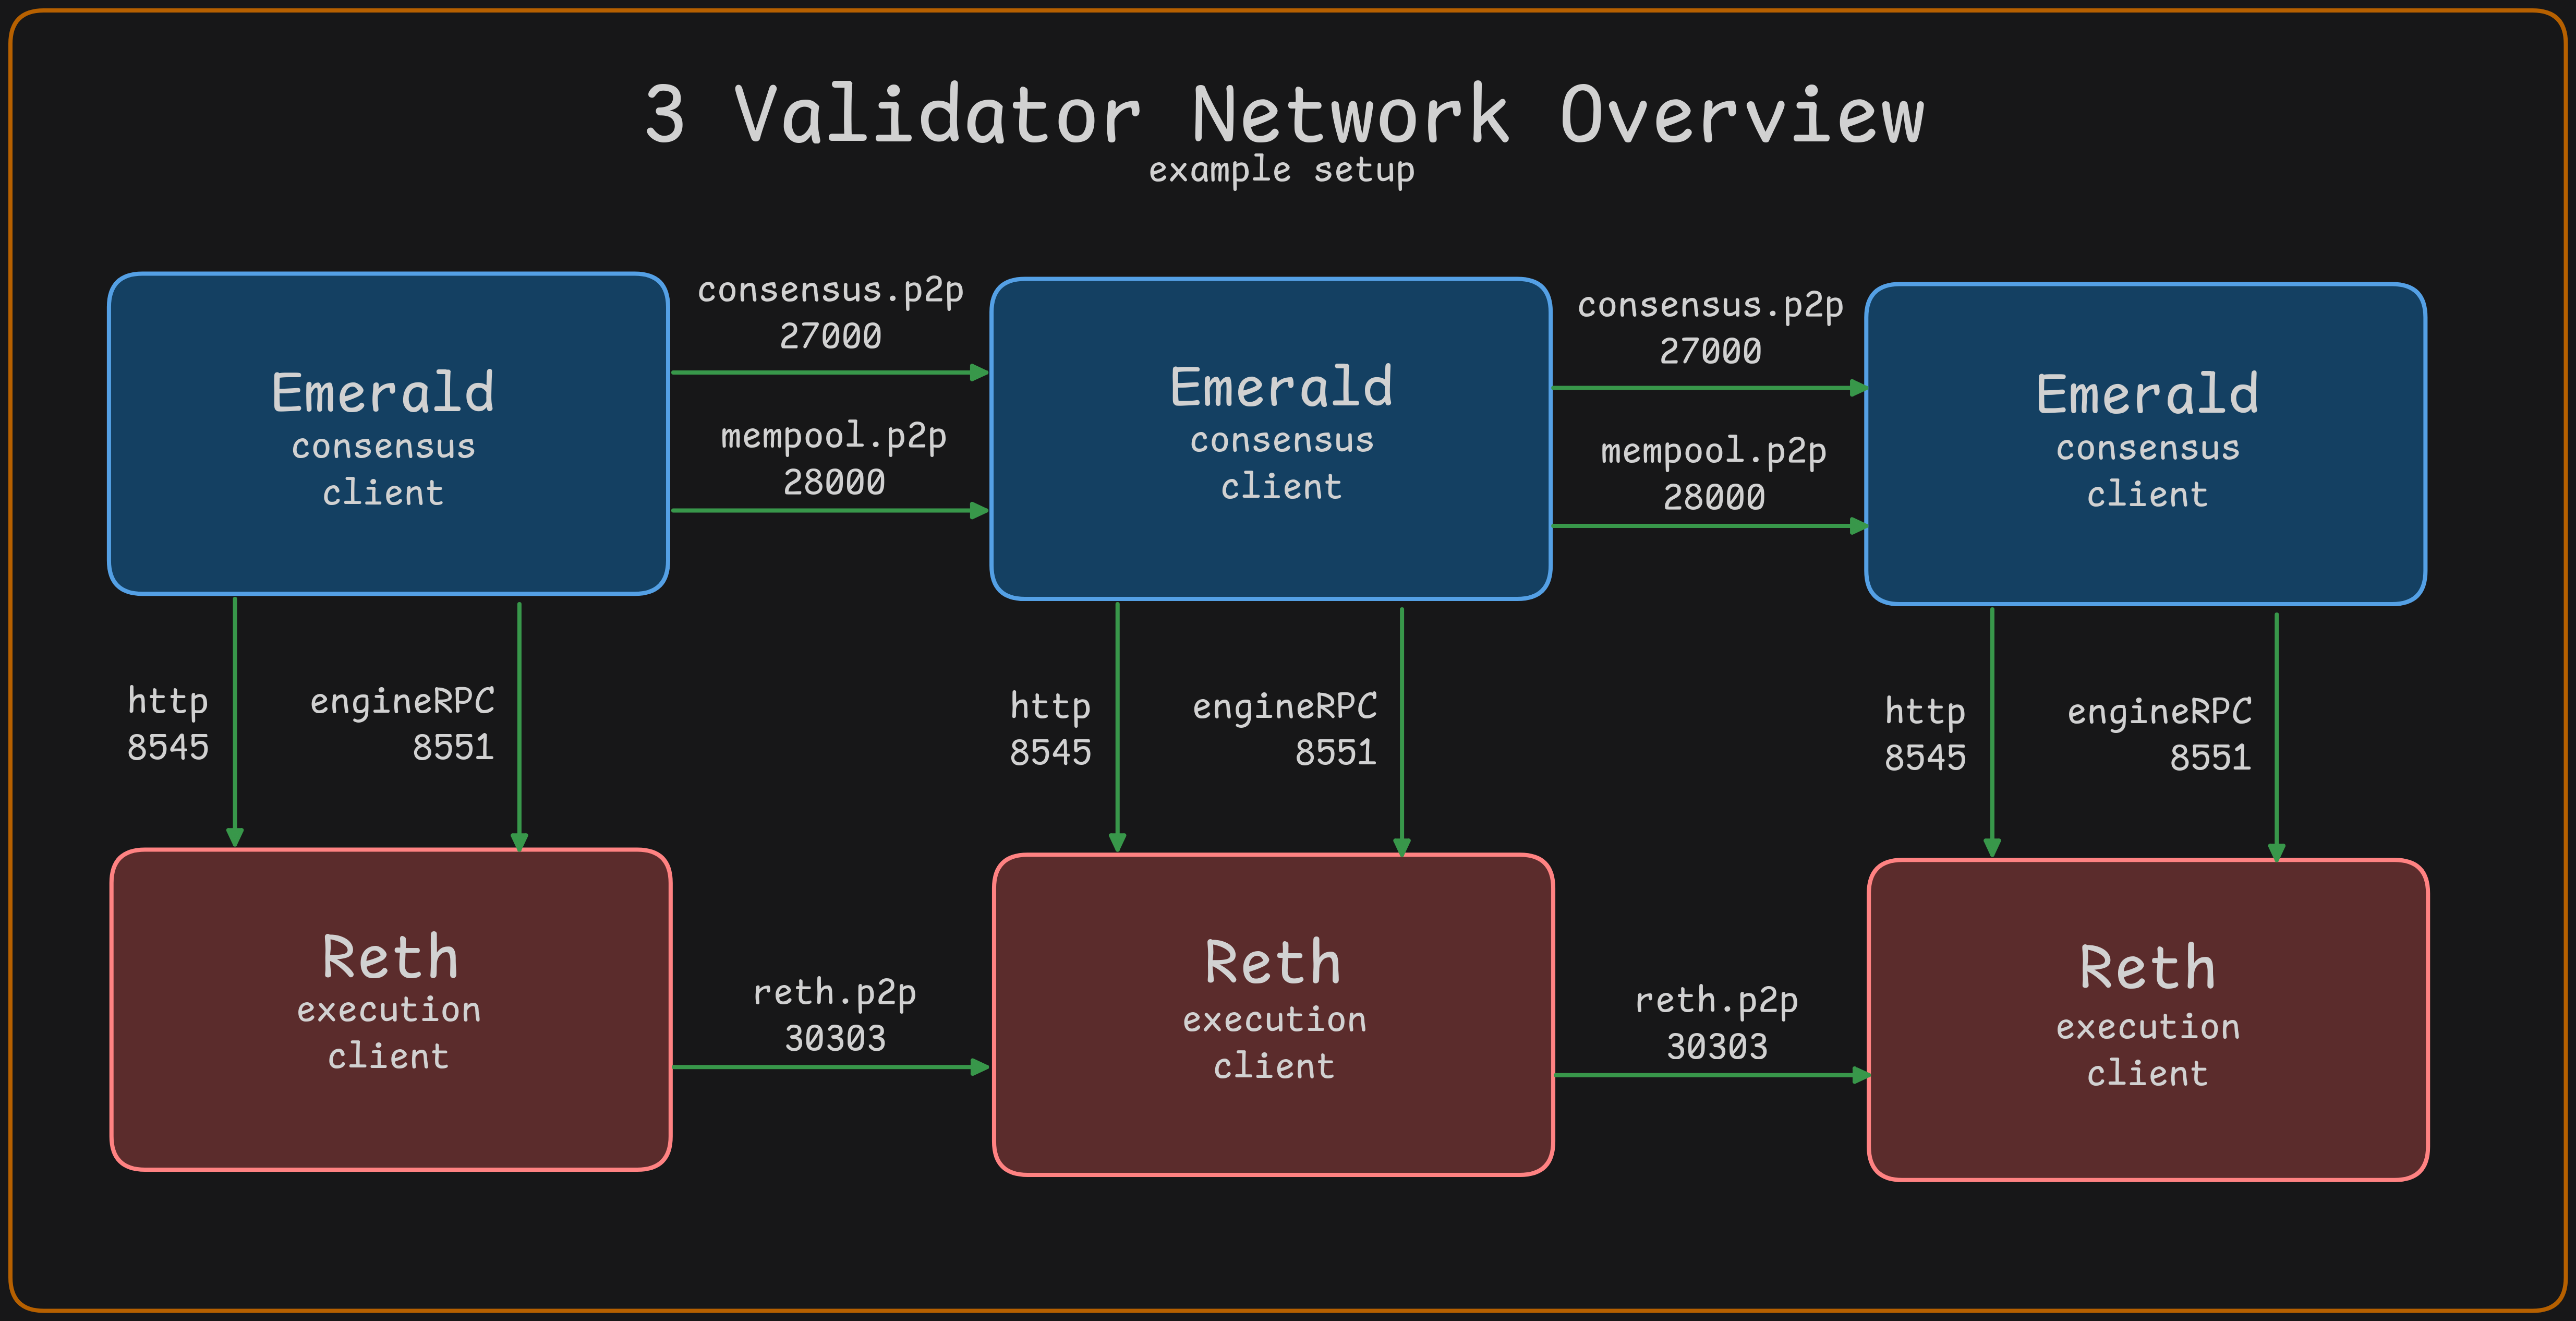
Network Overview
Required nodes to run for operations:
- Reth - execution client
- Emerald - consensus client
These two services will need to communicate with each other and with other nodes in the network. For best performance, they should be on the same server.
Installation
Prerequisites
Installing Emerald
git clone https://github.com/informalsystems/emerald.git
cd emerald
cargo build --release
This will build the Emerald binary and place it under target/release/emerald which can then be copied to the desired machine under /usr/local/bin/emerald for example.
Installing Reth
git clone https://github.com/informalsystems/emerald.git
cd emerald/custom-reth
cargo build --release
This will build the Reth binary and place it under target/release/custom-reth which can then be copied to the desired machine under /usr/local/bin/custom-reth for example.
Creating Network Genesis
This section covers the key exchange process between you (the network coordinator) and the network validators.
Step 1: Instruct Validators to Generate Keys
As the network coordinator, you need to provide each validator with the following instructions to generate their validator keys on their own infrastructure.
Instructions to Send to Validators:
Validator Key Generation Instructions
To participate in the network, you need to generate your validator signing keys. Follow these steps:
- Install Emerald (if not already installed):
git clone https://github.com/informalsystems/emerald.git
cd emerald
cargo build --release
This will build the Emerald binary and place it under target/release/custom-reth which can then be copied to the desired machine under /usr/local/bin/custom-reth for example.
-
Generate your validator private key:
emerald init --home /path/to/home_dirThis creates a private key file at
<home_dir>/config/priv_validator_key.jsonImportant
Keep this file secure and private. Never share this file with anyone, including the network coordinator.
-
Extract your public key:
emerald show-pubkey <home_dir>/config/priv_validator_key.jsonThis will output a public key string like:
0xd8620dd478f043bd27fc9389ec6873410265cf8640cb636decd2f0a2ddad7aa5656e58f05b1596a9c737f7073211089c6b49ab7ad5bdb9ab55bf83741b3ee4e4 -
Provide your public key to the network coordinator: Send only this public key string (starting with
0x) to the network coordinator. Do not send your private key file.
Step 2: Collect Public Keys from Validators
Once validators have generated their keys, collect all the public keys they provide. You should receive one public key per validator, each looking like:
0xd8620dd478f043bd27fc9389ec6873410265cf8640cb636decd2f0a2ddad7aa5656e58f05b1596a9c737f7073211089c6b49ab7ad5bdb9ab55bf83741b3ee4e4
Create a file (e.g., validator_public_keys.txt) with one public key per line:
0xd8620dd478f043bd27fc9389ec6873410265cf8640cb636decd2f0a2ddad7aa5656e58f05b1596a9c737f7073211089c6b49ab7ad5bdb9ab55bf83741b3ee4e4
0x9b9fc5d66ec179df923dfbb083f2e846ff5da508650c77473c8427fafe481a5e73c1ad26bed12895108f463b84f6dd0d8ebbf4270a06e312a3b63295cffebbff
0x317052004566d1d2ac0b3161313646412f93275599eb6455302a050352027905346eb4a0eebce874c35b1cd29bb5472c46eb2fd9ed24e57c2b73b85b59729e36
Step 3: Setup PoA Address
As the network coordinator, you need to create a PoA admin key that will control validator set management (adding, removing, and updating validators).
Use your preferred Ethereum key management tool (e.g., MetaMask, cast, or any Ethereum wallet) to generate a new private key. You will need the address (e.g., 0x123abc...) for the next step.
Important
This PoA address will have authority over the validator set, so keep the private key secure.
Step 4: Generate Genesis Files
Now that you have collected all validator public keys and have your PoA address, you can generate the genesis files for both Reth and Emerald.
Run the following command with your validator_public_keys.txt file:
emerald genesis \
  --public-keys-file /path/to/validator_public_keys.txt \
  --chain-id 12345 \
  --poa-owner-address <ADDRESS_GENERATED_IN_PREVIOUS_STEP> \
  --evm-genesis-output ./eth-genesis.json \
  --emerald-genesis-output ./emerald-genesis.json
This command takes all the validator public keys and generates:
eth-genesis.json: Genesis file for Reth (execution layer), including the PoA smart contractemerald-genesis.json: Genesis file for Emerald (consensus layer)
Step 5: Distribute Genesis Files to Validators
Now you need to share the generated genesis files with all validator participants:
- Send the genesis files: Provide both
eth-genesis.jsonandemerald-genesis.jsonto each validator - Share network parameters: Include the following information:
- Chain ID (the value you used in the genesis command)
- JWT secret (which you’ll generate in the next section - all nodes must use the same JWT)
- Peer connection details (IP addresses and ports for other validators)
- Coordinate node configurations: Each validator will need to configure their Reth and Emerald nodes (see sections below)
Important
All nodes in the network must use the same genesis files. Any difference will result in nodes being unable to reach consensus.
Running Reth (Execution Client)
Note
This section applies to all network participants (both the coordinator and all validators). Each validator must run their own Reth node.
Reth is the Ethereum execution client. It handles transaction execution, state management, and provides JSON-RPC endpoints for interacting with the blockchain.
Prerequisites
- Reth binary installed (see Installing Reth)
- Genesis file (
eth-genesis.json) created for your network (see Generate Genesis Files).
Generate JWT Secret
The JWT secret is required for authenticated communication between Reth (execution client) and Emerald (consensus engine) via the Engine API.
For the Network Coordinator: Generate a single JWT secret and share it with all validators:
openssl rand -hex 32
Save this hex string to a file (e.g., jwt.hex) and distribute it to all validators.
Important
- The same JWT must be used by both Reth and Emerald on each node
- All validators must use the same JWT secret (share the hex string with all participants)
- Each node should save the JWT hex string to a file and reference it in both Reth and Emerald configurations
Start Reth Node
Start Reth with the following configuration:
custom-reth node \
  --chain /path/to/genesis.json \
  --datadir /var/lib/reth \
  --http \
  --http.addr 0.0.0.0 \
  --http.port 8545 \
  --http.api eth,net,web3,txpool,debug \
  --http.corsdomain "*" \
  --ws \
  --ws.addr 0.0.0.0 \
  --ws.port 8546 \
  --ws.api eth,net,web3,txpool,debug \
  --authrpc.addr 0.0.0.0 \
  --authrpc.port 8551 \
  --authrpc.jwtsecret /var/lib/reth/jwt.hex \
  --port 30303 \
  --metrics=0.0.0.0:9000
Key Configuration Options
--chain: Path to genesis configuration file--datadir: Database and state storage directory--http.*: JSON-RPC HTTP endpoint configuration--ws.*: WebSocket endpoint configuration--authrpc.*: Authenticated Engine API for consensus client communication--authrpc.jwtsecret: Path to JWT secret file for Engine API authentication (must match Emerald’s JWT)--port: P2P networking port for peer connections--disable-discovery: Disable peer discovery (useful for permissioned networks)
Network Endpoints
Once running, Reth provides the following endpoints:
- HTTP RPC:
http://<IP>:8545- Standard Ethereum JSON-RPC - WebSocket:
ws://<IP>:8546- WebSocket subscriptions - Engine API:
http://<IP>:8551- Authenticated API for Emerald consensus - Metrics:
http//<IP>:9000- Prometheus Metrics Endpoint
Configuring Reth Peer Connections
For a multi-validator network, Reth nodes need to connect to each other to sync the blockchain state and propagate transactions. This section explains how to establish peer connections between all Reth nodes.
Why Peering is Important:
- Enables block and transaction propagation across the network
- Allows nodes to stay synchronized with each other
- Creates a resilient network topology
Method 1: Using the --trusted-peers Flag (Recommended)
This is the recommended approach as it automatically establishes connections when nodes start up.
Step 1: Each Validator Gets Their Enode URL
Each validator needs to obtain their node’s enode URL. The enode URL contains the node’s identity and network address.
To get your enode URL, start your Reth node first (with admin added to --http.api), then run:
curl -X POST -H "Content-Type: application/json" \
  --data '{"jsonrpc":"2.0","method":"admin_nodeInfo","params":[],"id":1}' \
  http://localhost:8545 | jq -r '.result.enode'
This will output something like:
enode://a0fd9e095d89320c27b2a07460f4046f63747e5b99ca14dd94475f65910bf0c67037fc1194a04d083afb13d61def3f6f1112757f514ca2fdabd566610658d030@127.0.0.1:30303
Important
Replace
127.0.0.1with your server’s public IP address before sharing. For example:enode://a0fd9e095d89320c27b2a07460f4046f63747e5b99ca14dd94475f65910bf0c67037fc1194a04d083afb13d61def3f6f1112757f514ca2fdabd566610658d030@203.0.113.10:30303
Step 2: Network Coordinator Collects All Enode URLs
As the network coordinator, collect the enode URLs from all validators and compile them into a single list.
Step 3: Distribute Peer List to All Validators
Share the complete list of enode URLs with all validators. Each validator should add the other validators’ enodes (excluding their own) to their Reth startup command using the --trusted-peers flag:
custom-reth node \
  --chain /path/to/genesis.json \
  --datadir /var/lib/reth \
  --http \
  --http.addr 0.0.0.0 \
  --http.port 8545 \
  --http.api eth,net,web3,txpool,debug \
  --authrpc.addr 0.0.0.0 \
  --authrpc.port 8551 \
  --authrpc.jwtsecret /var/lib/reth/jwt.hex \
  --port 30303 \
  --metrics=0.0.0.0:9000 \
  --trusted-peers=enode://PEER1_ENODE@PEER1_IP:30303,enode://PEER2_ENODE@PEER2_IP:30303,enode://PEER3_ENODE@PEER3_IP:30303
Example with actual values:
--trusted-peers=enode://a0fd9e095d89320c27b2a07460f4046f63747e5b99ca14dd94475f65910bf0c67037fc1194a04d083afb13d61def3f6f1112757f514ca2fdabd566610658d030@203.0.113.10:30303,enode://add24465ccee48d97a0212afde6b2c0373c8b2b37a1f44c46be9d252896fe6c55256fd4bd8652cf5d41a11ffae1f7537922810b160a4fd3ed0c6f388d137587e@203.0.113.11:30303
Note
- Each validator excludes their own enode from their
--trusted-peerslist- All enodes should use the public IP addresses of the validator servers
- Make sure port 30303 (or your configured P2P port) is open in firewalls between validators
Method 2: Adding Peers at Runtime (Alternative)
If you need to add peers to an already-running node, you can use the JSON-RPC API:
Prerequisites:
- Add
adminto the--http.apiflag when starting Reth - This must be done on all Reth nodes that will use this method
Add a trusted peer:
curl -X POST -H "Content-Type: application/json" \
  --data '{"jsonrpc":"2.0","method":"admin_addTrustedPeer","params":["enode://FULL_ENODE_URL"],"id":1}' \
  http://localhost:8545
Example:
curl -X POST -H "Content-Type: application/json" \
  --data '{"jsonrpc":"2.0","method":"admin_addTrustedPeer","params":["enode://a0fd9e095d89320c27b2a07460f4046f63747e5b99ca14dd94475f65910bf0c67037fc1194a04d083afb13d61def3f6f1112757f514ca2fdabd566610658d030@203.0.113.10:30303"],"id":1}' \
  http://localhost:8545
Verify peer connections:
curl -X POST -H "Content-Type: application/json" \
  --data '{"jsonrpc":"2.0","method":"admin_peers","params":[],"id":1}' \
  http://localhost:8545 | jq
Drawback: Peers added this way are not persisted across restarts. Use Method 1 for production deployments.
Systemd Service
For remote deployments, you can use systemd to manage the Reth process. See reth.systemd.service.example for a service configuration example.
Running Emerald (Consensus Engine)
Note
This section applies to all network participants (both the coordinator and all validators). Each validator must run their own Emerald node with the private key they generated earlier.
Prerequisites
- Emerald binaries installed (see Installing Emerald)
- Node configuration directory created (contains
config.toml,emerald.toml, andpriv_validator_key.json)- Recommended to setup a user
emeraldand use a home folder like/home/emerald/.emeraldand in there a config folder for all files.
- Recommended to setup a user
- Reth node must be running with Engine API enabled
- JWT secret file (same as used by Reth)
emerald.tomlfile has to containt the path to the genesis file used by Reth that contains the chain configuration (eth-genesis.jsonin our example).
Configuration Files
Each Emerald node requires two configuration files in its home directory:
1. config.toml (MalachiteBFT Configuration)
See malachitebft-config.toml for a complete example. Key sections:
- Consensus settings: Block timing, timeouts, and consensus parameters
- P2P networking: Listen addresses and peer connections
- Consensus P2P: Port
27000(default)- persistent_peers must be filled out for p2p
- Mempool P2P: Port
28000(default)- persistent_peers must be filled out for p2p
- Consensus P2P: Port
- Metrics: Prometheus metrics endpoint on port
30000
This file must be in config folder in home_dir, example /home/emerald/.emerald/config/config.toml where --home flag would be defined as --home=/home/emerald/.emerald
2. emerald.toml (Execution Integration)
See emerald-config.toml for a complete example. Key settings:
moniker = "validator-0"
ethereum_config.execution_authrpc_address = "http://<RETH_IP>:8545"
ethereum_config.engine_authrpc_address = "http://<RETH_IP>:8551"
ethereum_config.jwt_token_path = "/path/to/jwt.hex"
ethereum_config.eth_genesis_path="<PATH_TO_RETH_GENESIS>"
el_node_type = "archive"
retry_config.initial_delay = "100ms"
retry_config.max_delay = "2s"
retry_config.max_elapsed_time = "20s"
fee_recipient = "0x4242424242424242424242424242424242424242"
...
Important
The
jwt_token_pathmust point to the same JWT token used by Reth. Thefee_recipientmust point to a valid address as this address will receive fees.
This is where you define how Emerald connects to Reth. Make sure to fill in the Reth http and authrpc address.
Configure Peer Connections
For a multi-node network, configure persistent peers in config.toml:
[consensus.p2p]
listen_addr = "/ip4/0.0.0.0/tcp/27000"
persistent_peers = [
    "/ip4/<PEER1_IP>/tcp/27000",
    "/ip4/<PEER2_IP>/tcp/27000",
    "/ip4/<PEER3_IP>/tcp/27000",
]

[mempool.p2p]
listen_addr = "/ip4/0.0.0.0/tcp/28000"
persistent_peers = [
    "/ip4/<PEER1_IP>/tcp/28000",
    "/ip4/<PEER2_IP>/tcp/28000",
    "/ip4/<PEER3_IP>/tcp/28000",
]
Replace <PEER_IP> with the actual IP addresses of your validator peers.
In the Malachite BFT config.toml you will need to fill in the 2 sections (consensus.p2p and mempool.p2p) persistent_peers array.
It uses the format /ip4/<IP_ADDRESS_TO_REMOTE_PEER>/tcp/<PORT_FOR_REMOTE_PEER>. Make sure to fill in all peers in the testnet.
Start Emerald Node
Start the Emerald consensus node:
emerald start \
  --home /home/emerald/.emerald \
  --config /home/emerald/.emerald/config/emerald.toml \
  --log-level info
The --home directory should contain:
<home>/config/config.toml- Malachite BFT configuration<home>/config/priv_validator_key.json- Validator signing key<home>/config/genesis.json- Malachite BFT genesis file
An example Malachite BFT config file is provided: malachitebft-config.toml
The --config flag should contain the explicit file path to the Emerald config:
- Example:
--config=/home/emerald/.emerald/config/emerald.toml
Monitoring
Emerald exposes Prometheus metrics on port 30000 (configurable in config.toml):
curl http://<IP>:30000/metrics
Systemd Service
For production deployments, use systemd to manage the Emerald process. See emerald.systemd.service.example for a complete service configuration.
Configuration Examples
This section contains example configuration files that you can use as templates for setting up your Emerald network.
Emerald Configuration
- emerald-config.toml - Main configuration file for the Emerald consensus client
- Contains execution client connection settings
- JWT authentication configuration
- Node identification and networking settings
MalachiteBFT Configuration
- malachitebft-config.toml - Configuration for the underlying Malachite BFT consensus engine
- Consensus timing and parameters
- P2P networking configuration
- Peer connection settings
- Metrics endpoints
Systemd Service Files
These example systemd service files can be used to run Emerald and Reth as system services on Linux servers.
- emerald.systemd.service.example - Systemd service configuration for Emerald consensus client
- reth.systemd.server.example - Systemd service configuration for Reth execution client
Usage
To use these configuration files:
- Copy the relevant file to your configuration directory
- Modify the values to match your network setup
- Ensure file permissions are appropriate (especially for files containing sensitive data)
- For systemd services, copy to
/etc/systemd/system/and enable withsystemctl enable <service-name>
Important Notes
- Never commit configuration files with real private keys or secrets to version control
- Always use environment-specific values for production deployments
- Review and understand all configuration options before deploying
- Keep backup copies of your configuration files in a secure location
Performance Evaluation
While building Emerald we have put an emphasis on performance testing with the goal of understanding its limits. While tuning the execution client and the Malachite consensus engine is very application dependant, the goal is to get a best-case baseline to understand any potential overhead introduced by applications built on top of Emerald.
Malachite
Emerald is built on top of Malachite, a high performant version of the Tendermint consensus algorithm.
To understand the overhead of running with an execution client, we first benchmark Malachite without Reth.
We run a simple channel-based application on top of Malachite. The application only generates blocks of a certain size,
and forwards them to peers for voting.
As Malachite does not support variable block sizes in its channel based example app, we added this functionality to our own fork.
Setup
- Block size: 1KiB, 1MiB, 2MiB
- Deployments: single datacenter and geo-distributed
- Number of nodes: 4, 8, 10
- Hardware setup: Digital Ocean nodes, 8GB RAM, 4CPUs, with regular SSDs
Results
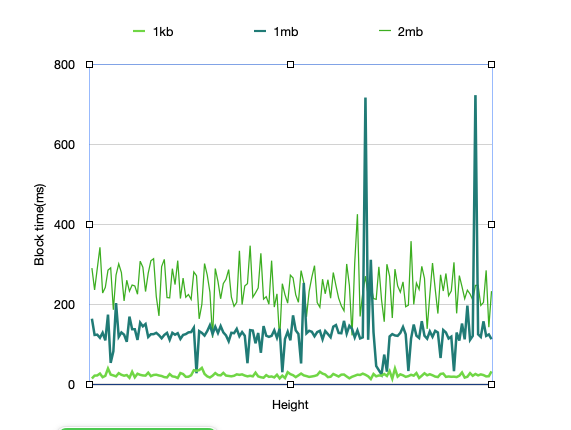
Single datacenter deployment on 4 nodes, with a varying block size. The average block time for 1MiB blocks is 133 ms.

Geo-distributed deployment on 8 nodes, with each 2 nodes in a different datacenter (NYC, LON, AMS, SFO). The geo-distribution impacts performance, with spikes in block times. The time for 1MiB blocks varies around 230ms, but has spikes above 300ms.
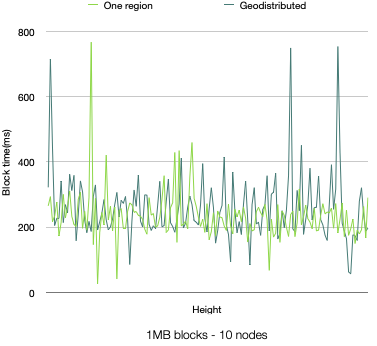
Deployment on 10 nodes, both in a single datacenter and geo-distributed, with 1MiB blocks. No significant difference from running on 8 nodes.
Although the channel-based application deployed on Malachite doesn’t have a concept of transactions, we can consider “native” Ethereum EOA-to-EOA transfers (i.e., plain ETH sends), which have ~110bytes. In this context,
- a single datacenter deployment on 4 nodes with 1MiB blocks and average block time of 133ms results in around 71.7k TPS
- a geo-distributed deployment on 8 nodes with 1MiB blocks and average block time of 230ms results in around 41.4k TPS.
Emerald
Configuration
For optimal performance, it is important to tune the execution engine according to application requirements.
The goal here is to push the system to achieve high throughput, while keeping it stable. By stable we mean handling incoming transactions without filling up the mempool, building blocks fast enough to keep up with consensus and sending data within the network to avoid congestion at the RPC level.
We use the following changes to the default Reth node configuration:
    "--txpool.pending-max-count=50000",
    "--txpool.pending-max-size=500",
    "--txpool.queued-max-count=50000",
    "--txpool.queued-max-size=500",
    "--txpool.basefee-max-count=50000",
    "--txpool.basefee-max-size=500",
    "--txpool.max-account-slots=100000",
    "--txpool.max-batch-size=10000",
    "--txpool.minimal-protocol-fee=0",
    "--txpool.minimum-priority-fee=0",
    "--txpool.max-pending-txns=20000",
    "--txpool.max-new-txns=20000",
    "--txpool.max-new-pending-txs-notifications=20000",
    "--max-tx-reqs=10000",
    "--max-tx-reqs-peer=255",
    "--max-pending-imports=10000",
In addition we are setting the --builder.gaslimit to 1_000_000_000 for cloud-based deployments and to 200_000_000 for bare-metal deployments.
For your particular setup this might be suboptimal.
These flags allow a very high influx of transactions from one source.
They are buffering up to 50_000 transactions in the mempool, and gossip them in big batches.
We also increased the buffer for pending tx notifications to 20_000 (from the default of 200).
As transactions, we use “native” Ethereum EOA-to-EOA transfers (i.e., plain ETH sends). A set of spamming nodes are injecting transactions signed by different accounts. Every spammer is sending transactions to one single Reth node.
Cloud-Based Deployment
Setup
- Deployments: single datacenter on 4 nodes and geo-distributed on 8 nodes
- Hardware setup: Digital Ocean nodes, 64GB RAM, 16CPUs, with regular SSDs
Results
Single datacenter deployment, 4 nodes. For a single datacenter deployments on 4 nodes, with block sizes of 0.5MiB to 1MiB, we observed a throughput of around 8000 TPS sustained. The reported block time is averaging at 220ms with spikes up to 230ms.
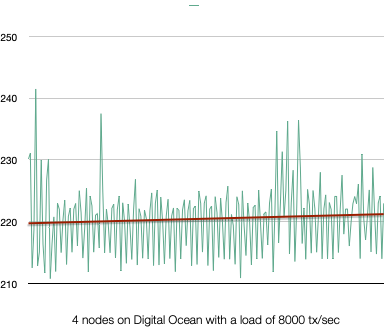
Single datacenter deployment on 4 nodes. Average block time of 230ms.
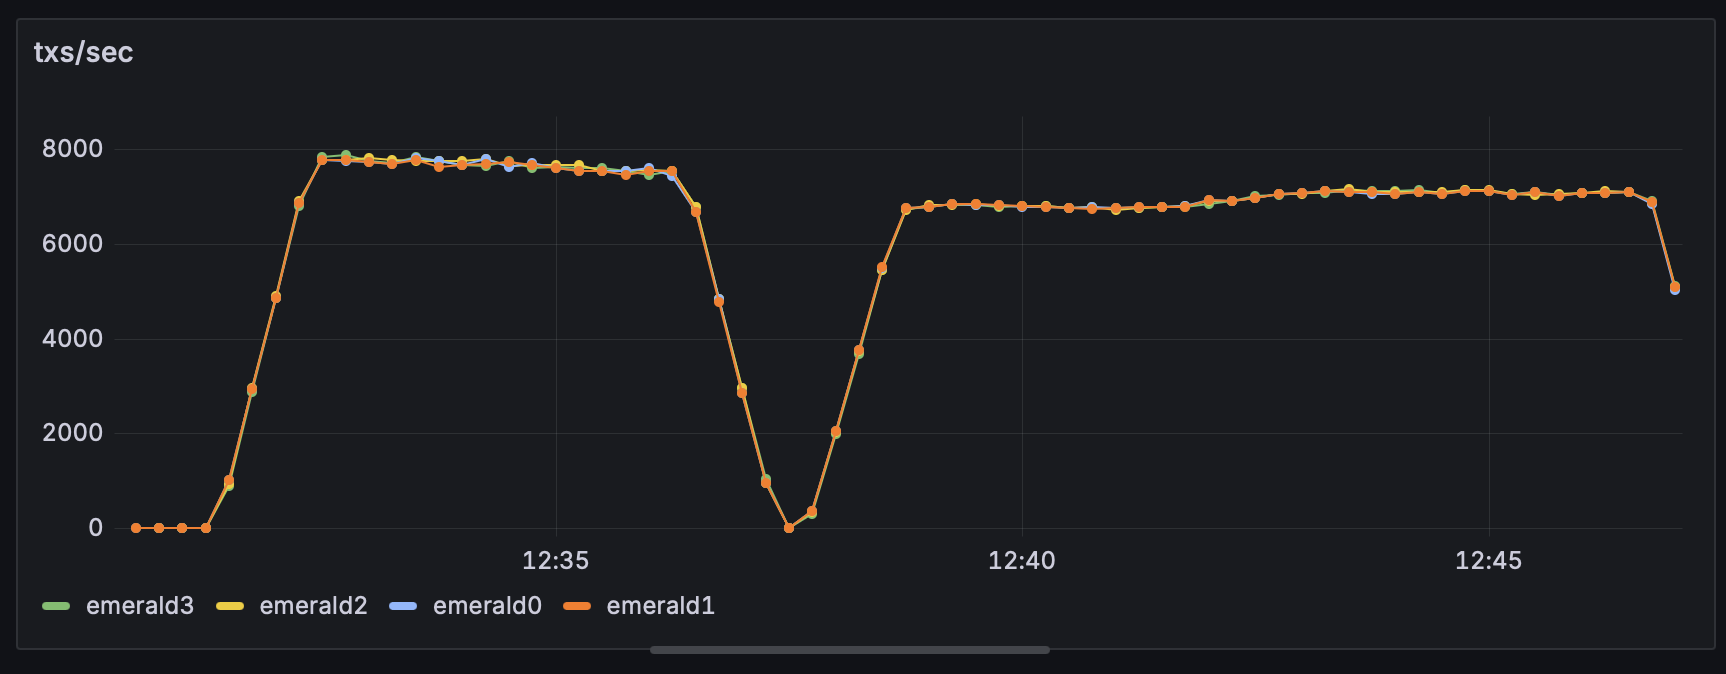
Single datacenter deployment on 4 nodes. 8000 TPS sustained.
Note that when injecting a higher number of transactions into a node, we observed instabilities most likely on the RPC side. Thus, we split the injection into multiple RPC requests. Sending batches every 200ms leads to 8000 TPS sustained. Sending more frequently, every 100ms, results in a drop of performance.
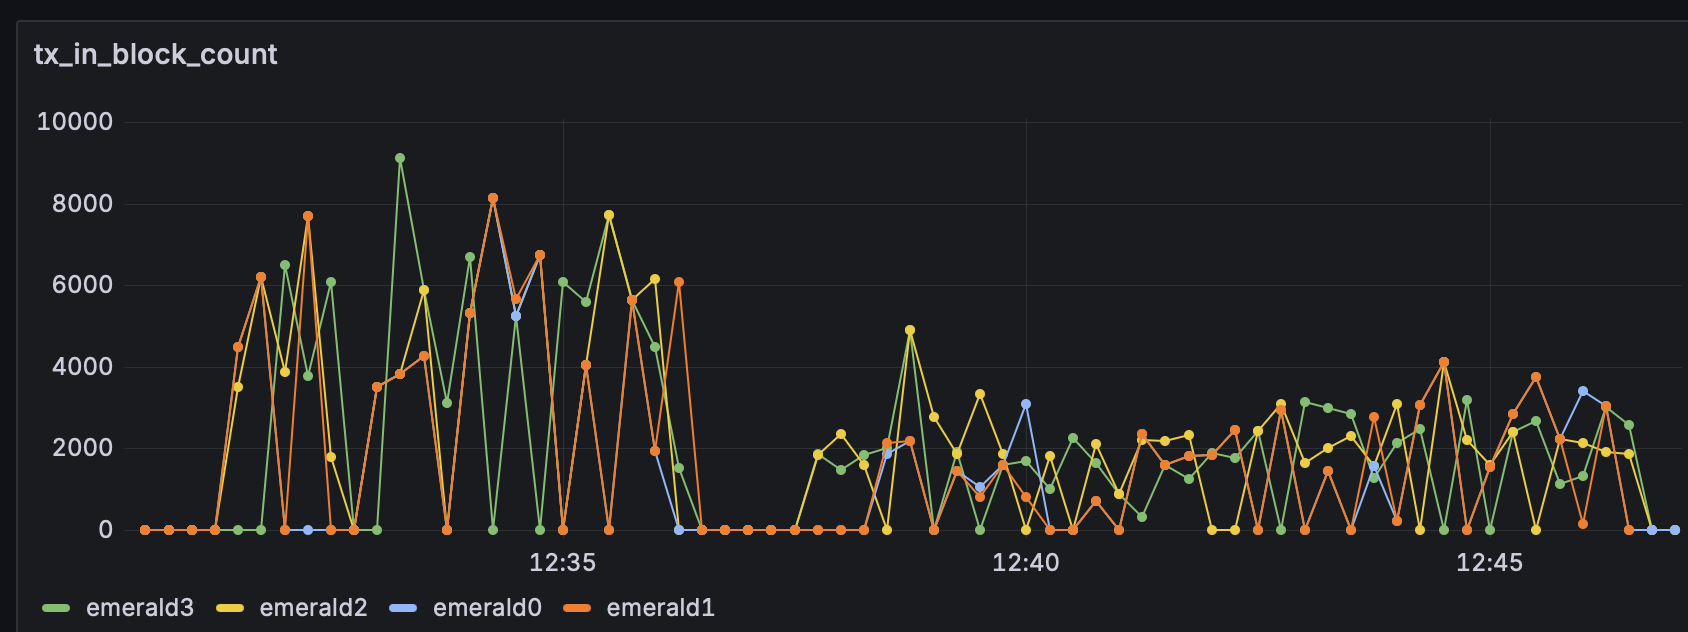
Single datacenter deployment on 4 nodes. Number of transactions per block.
Geo-distributed deployment, 8 nodes. For a geo-distributed deployment on 8 nodes, with two nodes placed in each datacenters (NYC, LON, AMS, SFO), we observed a throughput of around 5800 TPS sustained. The reported block time is averaging at 220ms.
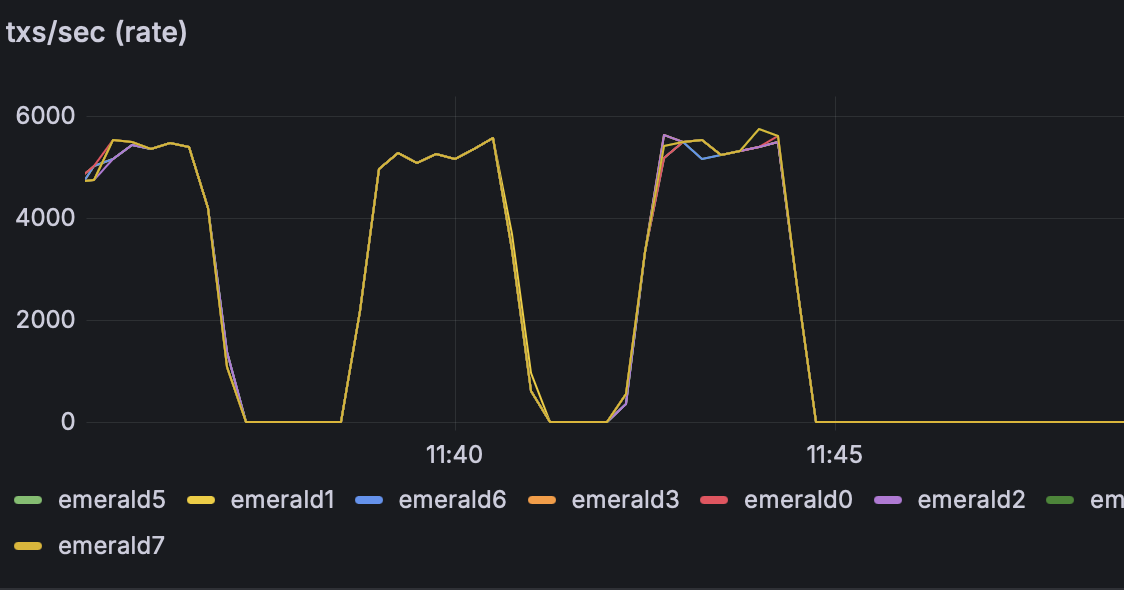
Geo-distributed deployment on 8 nodes. 5800 TPS.
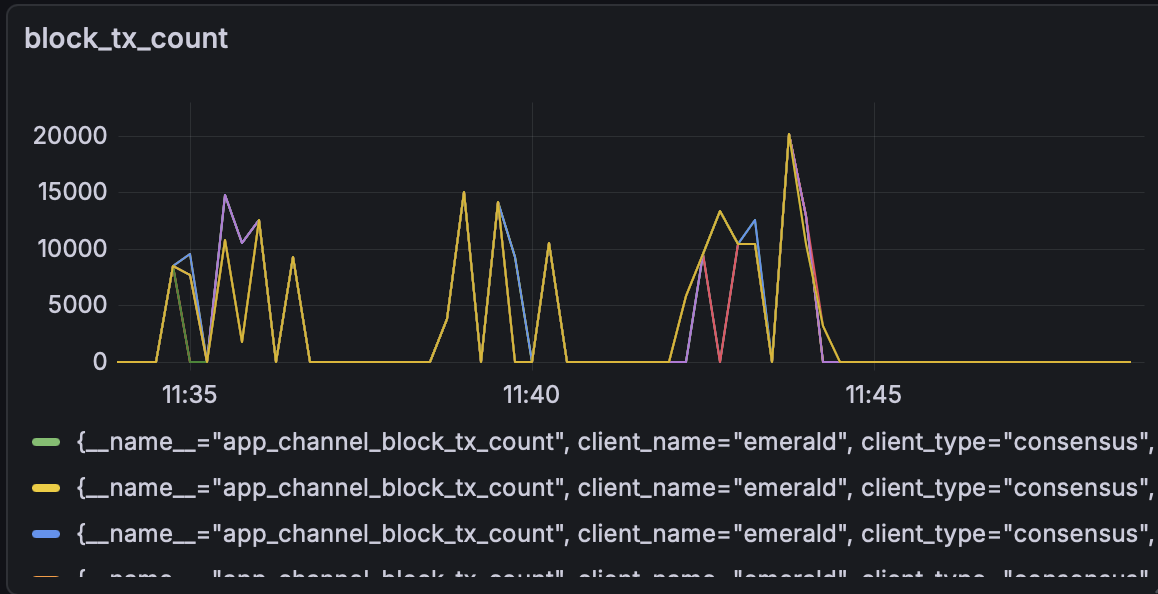
Geo-distributed deployment on 8 nodes. Number of transactions per block.

Geo-distributed deployment on 8 nodes. Average block time of 220ms.
Bare-Metal Deployment
Setup
- Deployments: single datacenter on 4 bare-metal nodes
- Hardware setup: 32Gb RAM, AMD EPYC 4584PX CPU, Micron 7500 1TB NVMe
These experiments evaluate Emerald on 4 bare-metal machines in a local and geo-distributed setup. The goal is to understand the absolute best performance the chain can have.
Results
We observed a throughput of around 9200 TPS peak and 8300 TPS sustained. The reported block time was between 170ms to 230ms.
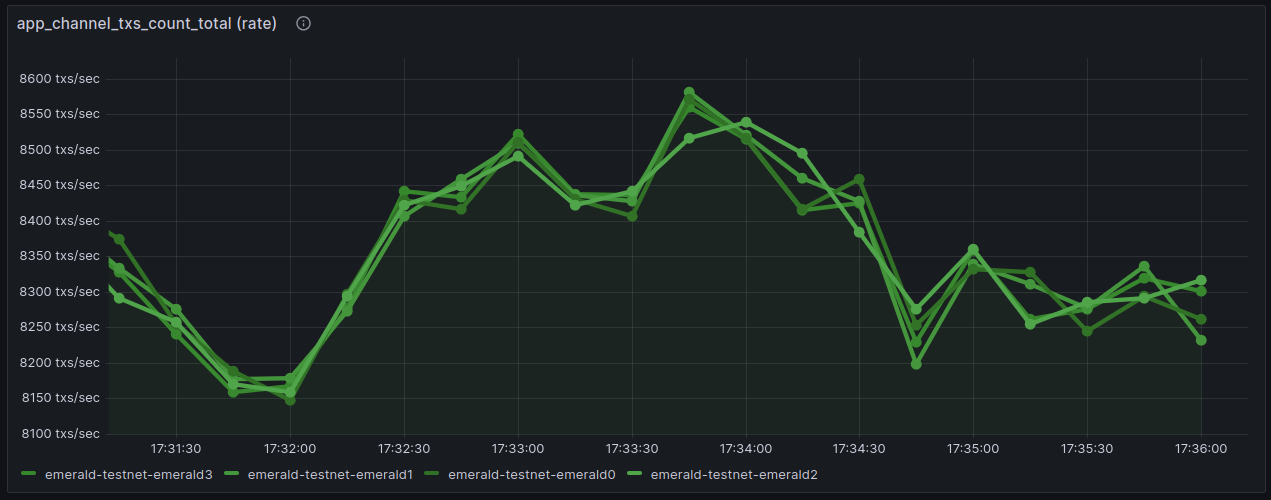
Bare-metal deployment in a single datacenter deployment on 4 nodes. **8300 TPS** sustained.
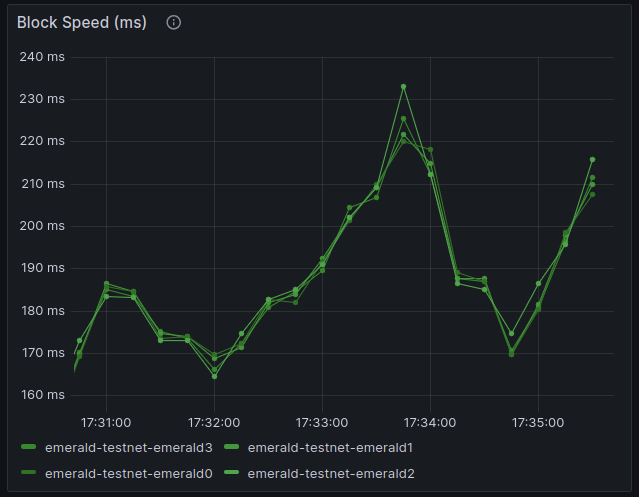
Bare-metal deployment in a single datacenter deployment on 4 nodes. Block time between 170ms and 230ms.
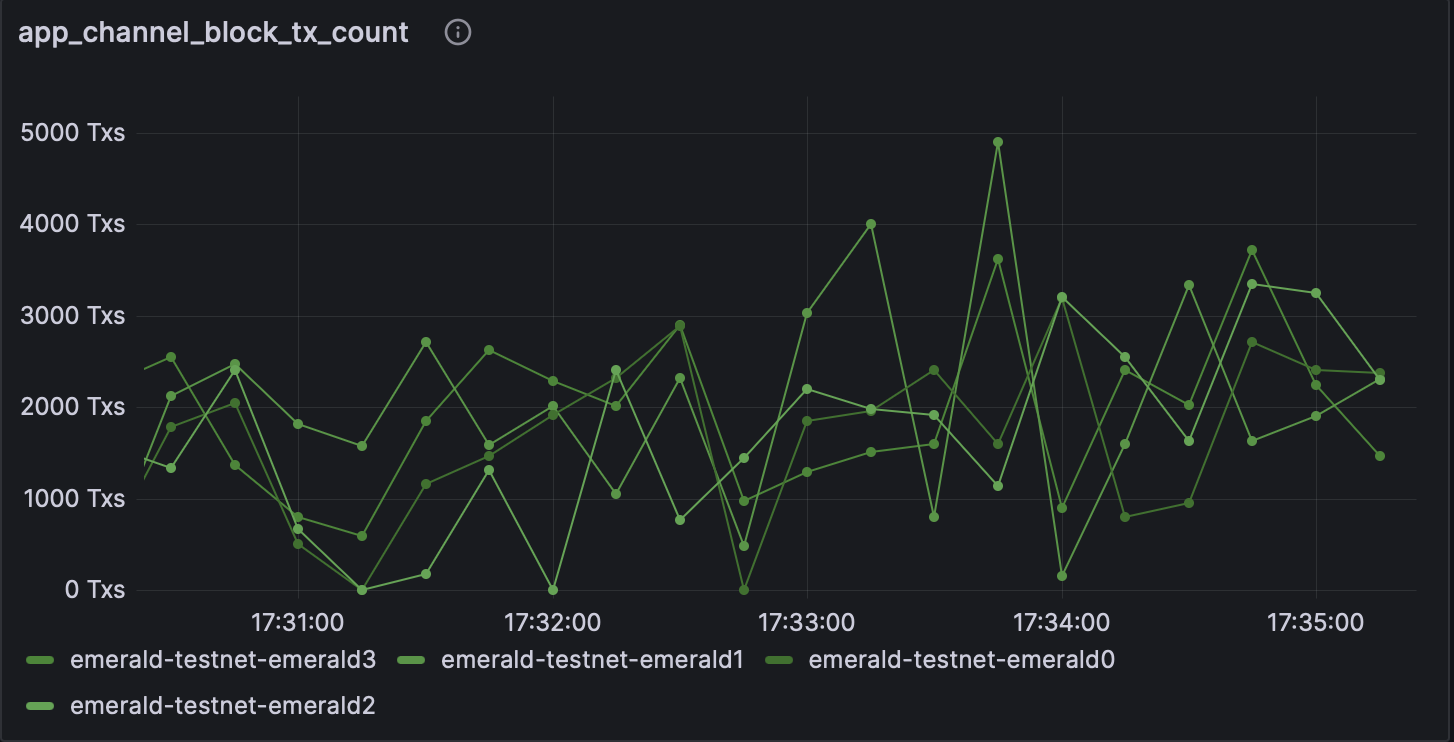
Bare-metal deployment in a single datacenter deployment on 4 nodes. Number of transactions per block.